Furniture stores have a wide range of different furniture. All the stinks can be different, form that design, but richly cіkavіshe robiti vibrіb with your own hands. In order to make a wooden armchair with a hand, you need to use the tools of the hand to make it work. And for the relief of the task, there is an impersonal report chair and lessons in the preparation of furniture.
Prepare an armchair from a tree - the worker’s worker, but you can turn around with her, be it a poor person. Knowing the best option and three free hours, you can proceed to work. The process itself is made up of the development of the reporting armchair and the preparation of details, which will then be necessary to unite in one goal. All instructions can use the standard algorithm for making, with some help, prepare the details, open the door for fastening, fasten the details for additional screws and glue, and in the end, farbout the vibr or lacquer.
Folding armchairs can be carried out according to the established plan, so as not to bring about a pardon.
The work of preparing the chair is based on a specific type. Even if you don’t look like a leather armchair, you can build it with your own hands, you can use them for either mechanized or professional skills. Vivchivshi all possible options, it is necessary to choose the one that will give strength to you. It is unreasonable to take one step at the folding armchair, for one who does not see anything as a result.
Krіsla, yaks really work independently:

It is easy to finish a wooden armchair, so you can choose the right way. You can beat the old armchair or the steel, as there is no possibility to add more details. You can build a small armchair from a banquette, as if it were worthy of being a child. For the creation of a classic armchair, sound vicorist boards, bars, decks. Virib z array may have a number of advantages over other pieces of furniture, even wood is an environmentally friendly material, which is absolutely harmless for health.

Natural wood is not a cheap material, ale vono - a pledge of the quality of a self-made armchair. Having rested at the yakіsny tree, you can open up the creation of a wickerwork of mysticism. On an array of wood and bars, there are knots and cracks. All the details need to be carefully polished, and then we proceed to the selection. And a special cover on the coast of the material against the attack of the coma that rozsihannya.
For the preparation of an armchair better vikoristovuvat oak, birch, clear chi vilhu, to the fact that the stench can create a unique beauty. Qi materials allow to serve for a long time, do not ripple and do not crackle. The beauty of the virobu can be reinforced with yakіsny textiles, which zastosovuvatimetsya under the hour of upholstery.
The main concern of the village is the whole ecology. The same sim won't look like other materials. Vaughn is widely widened in everyday life, so that it is visibly easy to get and її less variety for a lot of other materials.
The wood is more durable and can compete with metal. There is no plastic deformation and it is good to endure the blows and the pressure. It is easy to work with her, you can build an armchair from a village on your own. To the minus of this material, one can see intolerance to water and high temperatures. Under the infusion of water, the wood swells and swells, so it is necessary to cover it with varnish in front.

Pokrokov's instruction will help to speed up the hour of work as much as possible and protect the collection of materials. Most popular cover instructions from the preparation of armchairs:
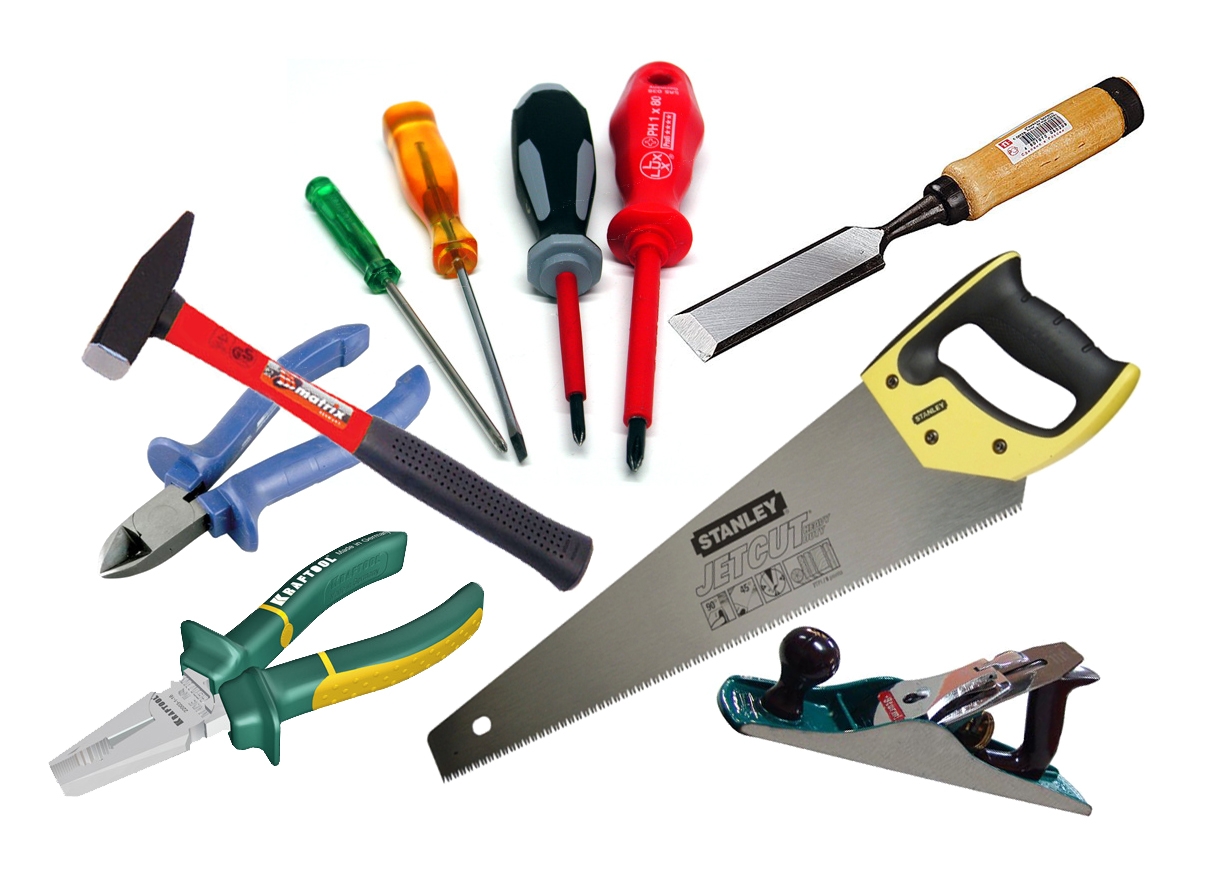
For the cob, it is necessary to prepare the necessary tools and materials: electric saw, planer, hand mill, hacksaw, screwdriver, drill, centimeter, self-tapping screws, glue and boards. Order dіy:
Having finished the work, it is necessary to sand all the surfaces and attach the drops of screws with wooden plugs. You can make a wooden armchair ready for olive seepage.
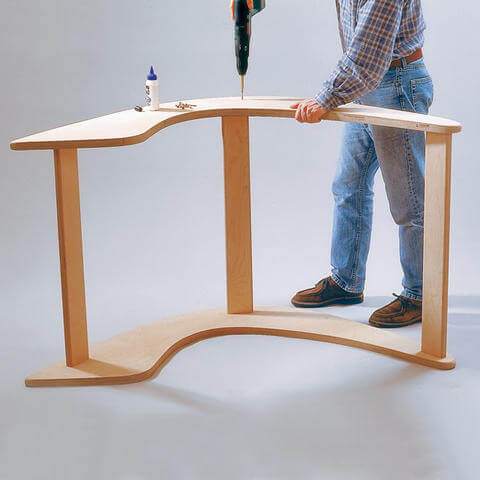
You can make this extraordinary armchair with your own hands for the help of the armchair and schemes, as if it were possible to create in a computer program to develop. It is necessary in order to take accurate measurements and contours of all folding geometric details. Order dіy:
The folding armchair is used for the help of carpentry glue, which is used to fasten all the details. For this process to pass without a foot, it is necessary to fasten the gluing points with clamps. Instead of the adhesive method, you can twist the screws, or screw them in as needed deeply, so that their droplets are not visible.
For the preparation of this virob, one does not need a chair and the preparation of additional elements.
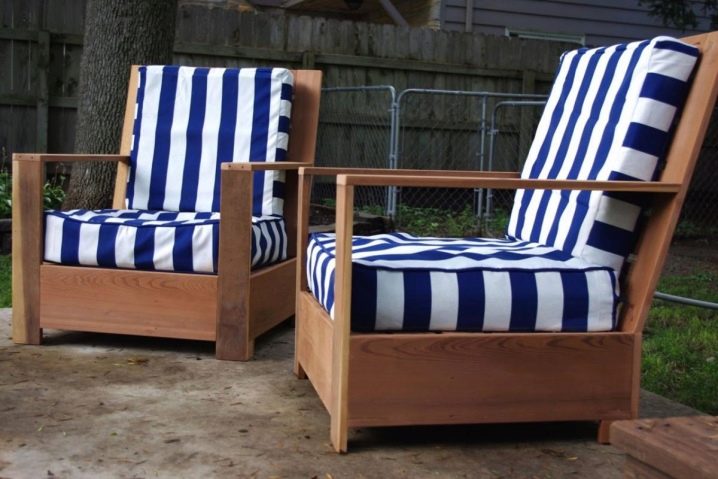
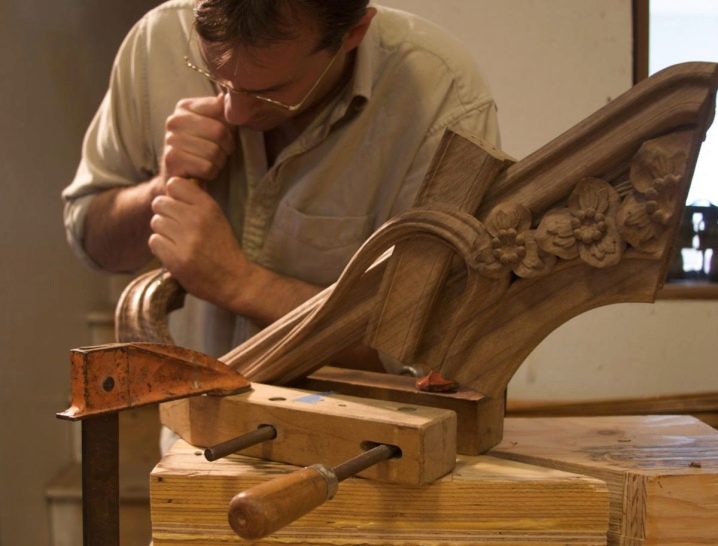
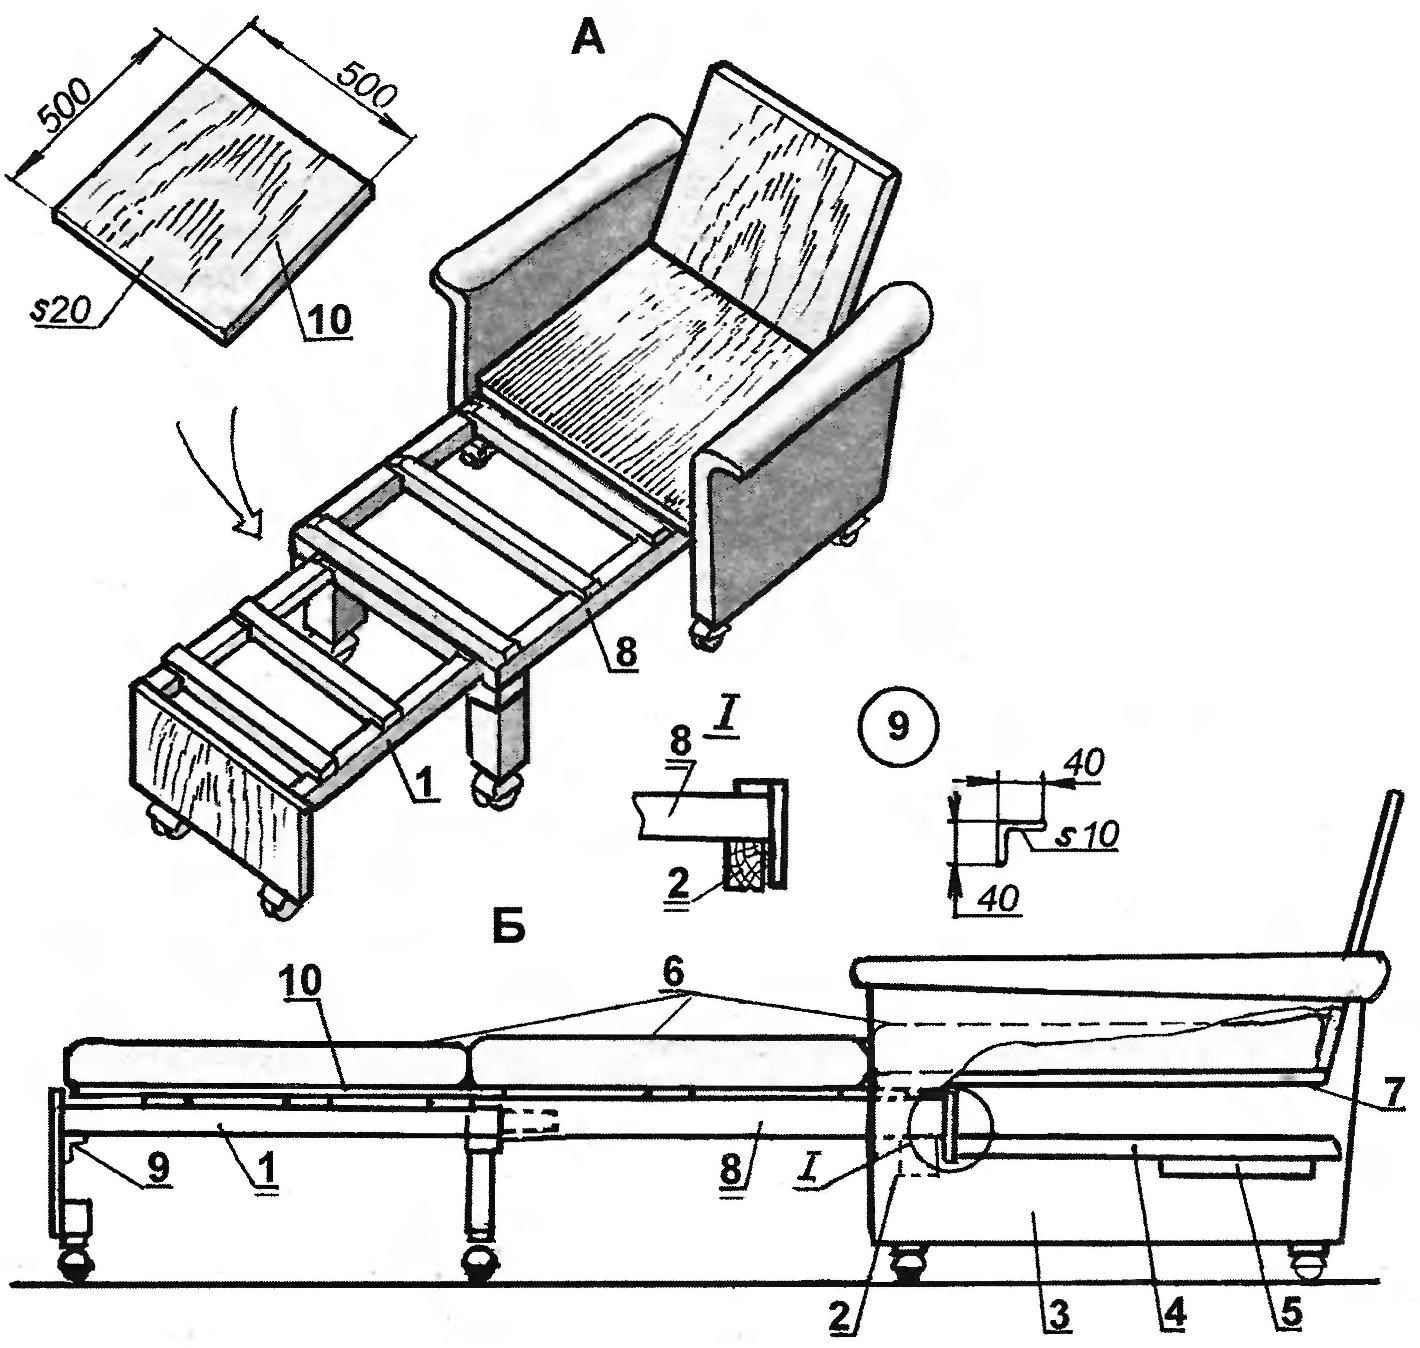
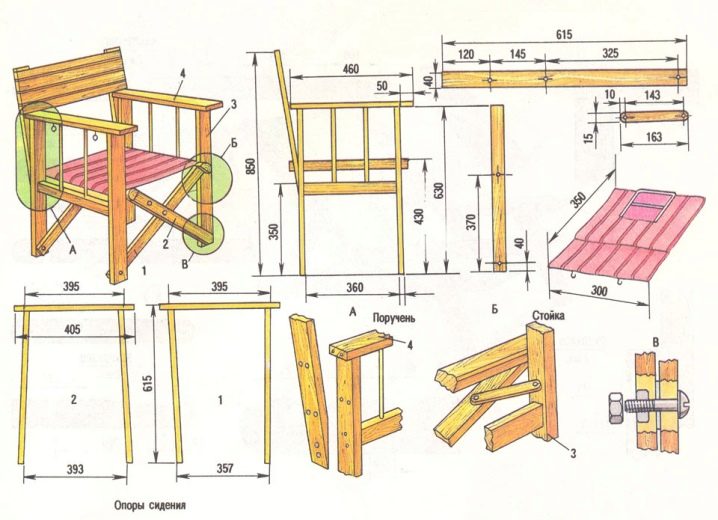
The preparation of wooden furniture is an ancient type of applied art for our people. Vykoristovuyuchi simple tools and widely available in our material materials, masters create virobi, which exude high quality and originality, which is visible in the skin details. The presence in the possession of living quarters with wet-made furniture can be rich in private houses and summer cottages. After a protracted winter, I so want to come out in the fresh air and cook with my own hands. Inconsistent at the vikonannі, and, smut, even more demanding for a complete repair on the territory of the garden plot, become garden furniture. The armchair, perhaps, will become an indispensable attribute for any summer resident. The most natural and natural material for making garden furniture is, obviously, wood. Tse mozhe buti yak gentry wood - beech, oak, mountain, and less expensive breeds - pine, wasp, linden.
According to their design features, garden chairs are divided into two main types. For the first ones, the rear seat leg and the back are a single element, for others, the rear legs and vertical bars of the backs are composed of different parts. The seats are framed with solid shield or frame. A frame is inserted between the legs of the armchair, as it is called a pass. Such a solution allows the double zbіlshiti mіtsnіst design and the term її ekspluatatsії in parallel with such a virobe, but even without pronіzhki.
There is another way to increase the minerality of a wooden viroba, as you know the future advantages, and thorn-free. The greater the revision of the details, the width of the spikes, the greater the width of the thorns, the greater the difference will be. For a support-pillar made from a tree of hard leafy pores, the size of the square legs at the perimeter must be cut no less than 28x28 mm, for straight-cut legs, the indicator may be buti hocha b 22x40 mm. If you go about the tree of coniferous trees, the values are automatically increased by the second time.
At all rіznomanіttі nadani on the Internet, the armchair of the garden chair, varto vibrate those, like you have the strength to prepare, and before that, mother of the privileges old look. Otzhe, to build a garden chair, it is necessary to think over how you would like to use yoga, and, if possible, build an armchair, and then prepare a warehouse for the future viroba.
For the fixation of the elements of the garden chair, use glue, bolt that screws. And the axis for the installation of the delivered plant you need a standard carpentry extension:
To prepare an armchair for the dacha is not necessary for the overworld zusils. Details for the new one are of the same type, and then, simply prepared and interchangeable. We should be appointed, whichever armchair we need, even if the model looks good, not only like a garden chair for grown-ups, but you can also make a changed copy for younger members of the family. Ale before him, how to begin to work, it is necessary to prepare the chair of the garden chair.
For this garden chair, we need boards with a thickness of 50 mm and 25 mm. The armchair is folded with four legs, two supports for the backrest, two supports for the seat, two supports for the armrest, 7 slats for the backrest, one seat and two arms. For fastening, 10 bolts 10x100 mm with nuts and washers are required, as well as 40 screws 50 mm each.
Recreate on the doshtsi future details for the representations on the armchair of the garden armchair with the dimensions and viplyaєte їх. It is necessary to grind the skin with a planer, and then clean it up after the help of a grinding machine. It is necessary to give special respect to the ends of the elements in the viroba, in order to protect them from the water. For all the sound surfaces, it is possible to carry out such a treatment with hot linseed oil.
The next step will be a rosette and a drill, having opened the bolts. For which you need a 10 mm drill.
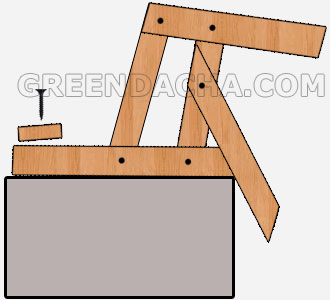
To fold the side frames, put them on the bottom surface so that the rear legs do not respect distant manipulations. To creak a part of the viroba is povidno to the chair. The head mentality of the correct folding is those that the parts will be mirror reflections of one of one. Lay the offending parts on the stand 640 mm between them. Details for the back of the armchair must be attached with screws parallel to each other, you can work small gaps between the planks, or you can attach them close to your head, at your discretion.
To return the respect that an important technological trick at the preparation of garden chairs is established by the maisters: the seat due to the mother is sickly in terms of the length to the back, only in this way the armchair will be most handy. It is even more important that the elements of the reinforcement did not chip the clothes and were not the cause of injury, so they should be “drowned” in the tree. For whom special chamfers are shattered, as if for the help of victorious steel, drill bits of a larger diameter are drilled, open the screws yourself.
Similar to the elements of the backrest, the details of the seat are attached, with which the bar is shortened, it is to be found between the front supports of our chair. Now it’s lost on the right behind the malim - bring the paddlers.
Another important manipulation will be the removal of the bottoms from the rounded ones, or by cleaning the ends, the armchair is right, as it spirals onto the flat with all the bottoms.
The garden chair, for its recognition, can be enduring, so that the sun and the vologer did not set a significant shkod, it is necessary to protect the tree. For whom do you want lacquer abo farba. Bazhano apply a sprat of balls, the skin of which is guilty to dry for at least 24 years.
Natural bazhannyam bude porashchit svіy virіb - add m'yak base on the seat or fit fabric with foam rubber.
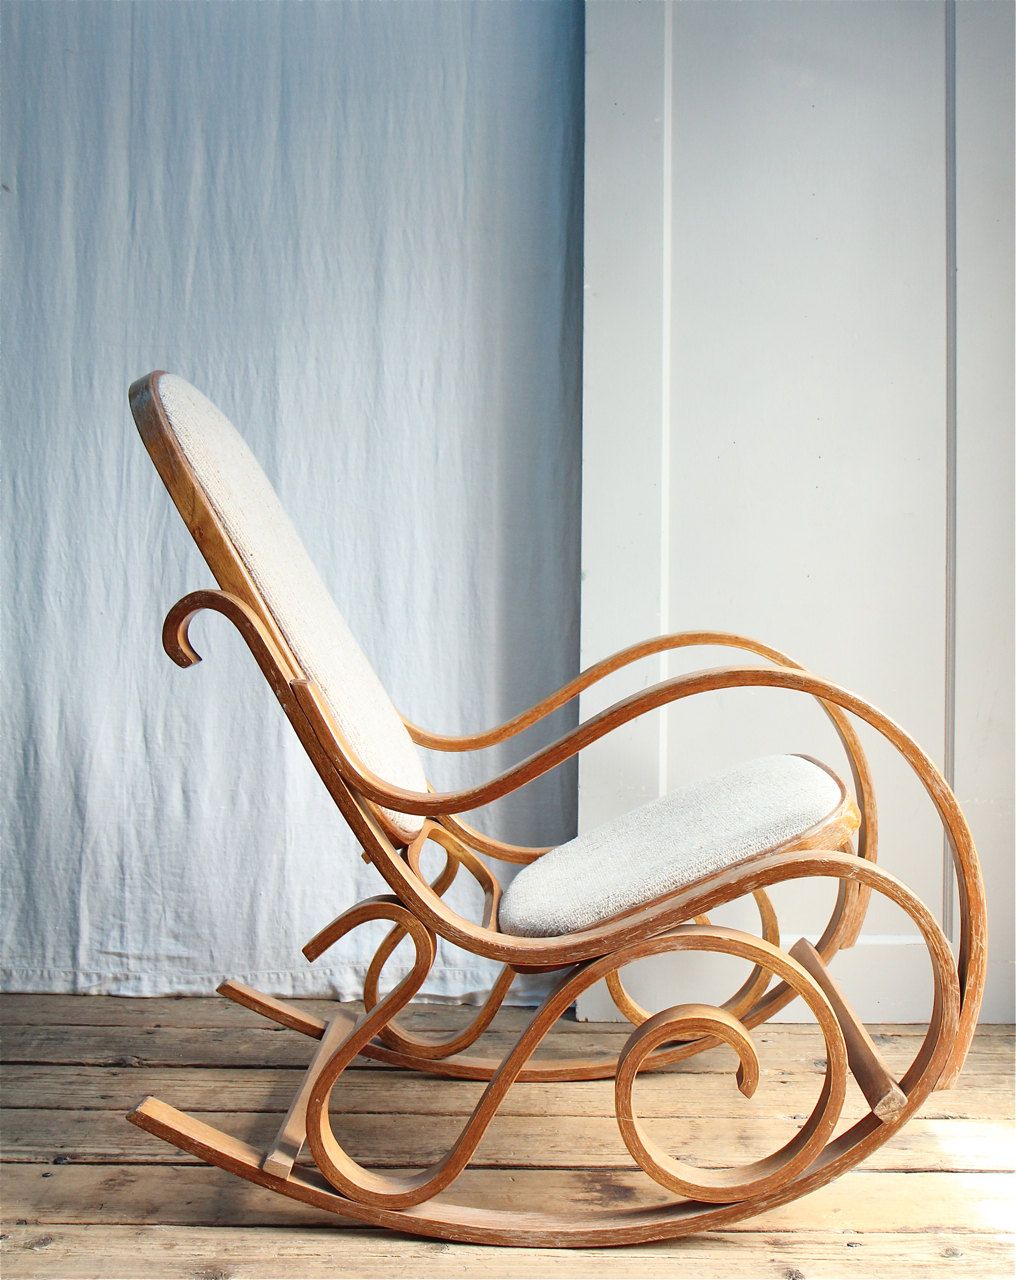
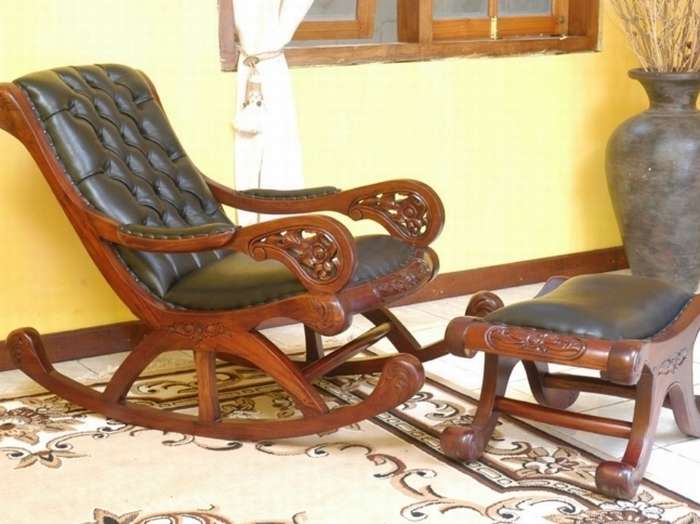
Singingly, not a single human being, if at least once I didn’t dream properly and rhythmically move around in the rocking chair and allow my body to relax and enjoy comfort. And such an item of luxury could be a garden chair-goydalka, dragged and crushed with wet hands.
For the preparation of a garden chair, it is best to use natural materials. Wonderfully looking at the aphids of a green meadow, an armchair with willow vines or rattan. However, it is not possible to call such a choice as a teacher, and for such a work, such a work will require special skills.
As the head lights to the rocking chair є mіtsnіst і znosostіykіst, then the most suitable material for new milling is metal, but the strength is not too strong.
Regardless of what was said above, build a garden chair-goydalka with your own hands, constructively, hardly more foldable, lower than an armchair. And the only thing between them will be the presence of a snake crawler (abo lie). The stench can be equal in age, important in your right will be stamina, even the head mind between long and short skids - the amplitude of the armchair hitting. It is also necessary to pay attention to the important fact that the current runners will be less important.
For the preparation of the simplest goydal chair, it is not necessary to make a chair. І for whom you can use the old armchair as a whole or use the wooden legs. Paint on paper a wide element from a curved base, and then cut two such runners from the bars of a tree. On these details inner side it will be necessary to swipe the fingers in order for the legs of the wooden chair to stand on them. Near the skin leg, it is necessary to nail one interfering bar from the skin side, all the way up. So, as we have a self-styled armchair, without any frontal roses, then for a safe and stable goydannya, screw three large bolts at the skin support. We insert the lower legs of the armchair between the beams nailed to the support and the curved construction with a plate of plywood or thin boards. In front of the skids, you can add a support for the lower part of the slats. And in order to prevent our armchair from going too far, there is little fluctuation in the back on the runners, as if we were extinguishing the speed of the day and, therefore, ahead of the change.
Yakscho for you not toil great significance the dimensions of that vaga of the finished virobu, you can build a double armchair-goydal from scratch. Armchairs of the side parts of such a design can be easily found at open access and copied onto papier, so that we can then transfer the contour to the material, which can be victorious without serious blunders. It is also important to work everything right on the cob, so that the sidewalls are identical, and the lower part of them is perfectly rounded. The accessory material for our veneer will be 30 mm euro plywood. Behind it, the frames are vibrated, which hurt the sidewalls. The length of the frame will lie in the width of your bag, and about the smallness, you will come up with the help of properly arranging the comrades of the element, which is behind the sidewalls. On top of the seat and back, it is folded with long and thin bars, fitting one to one, or close, or on a small stand, to your mind. There is no special standard for folding such a machine, so a leather master can make his own algorithm. The frames between the sidewalls are ruffled in the corners, in the middle part and in the legs, and at the back, more quickly for the help of long conformations. It is necessary to indicate that it is the same thing, if it is better to open it up, and then open it up.
So, as it is built up from a great number of long and thin frames, then with them fixed to the foundation, you can zastosuvat small cunning, as if you ask the manager. Go about the "conductor". Such an addition, without special turbos, will precisely drill the bars on the required surface. It is possible to do yoga in the field of materials that are lacking. Attached from the butt and from the side of a small piece of plywood, which is a border, and a “conductor” is drilled into the space we need. Now, open the door, what to come out, we are preparing blanks. Rozmіtka vyde іdeally equal and symmetrical. Dali on the right of the technique and your prac- tiovitity , it is necessary to drill open in the specified bars and the ends with the base of the screws. For beauty and completeness, open the door to the screws and fill it with putty. The final stage of the work is to cover your viroba with chi farboi varnish. Only in this day of the garden will the armchair serve with your own hands for a long time, and you will not only guess about your craftsmanship, but you will definitely become an object of pride for the good vikonan robot.
Recorded from: 12-11-2016
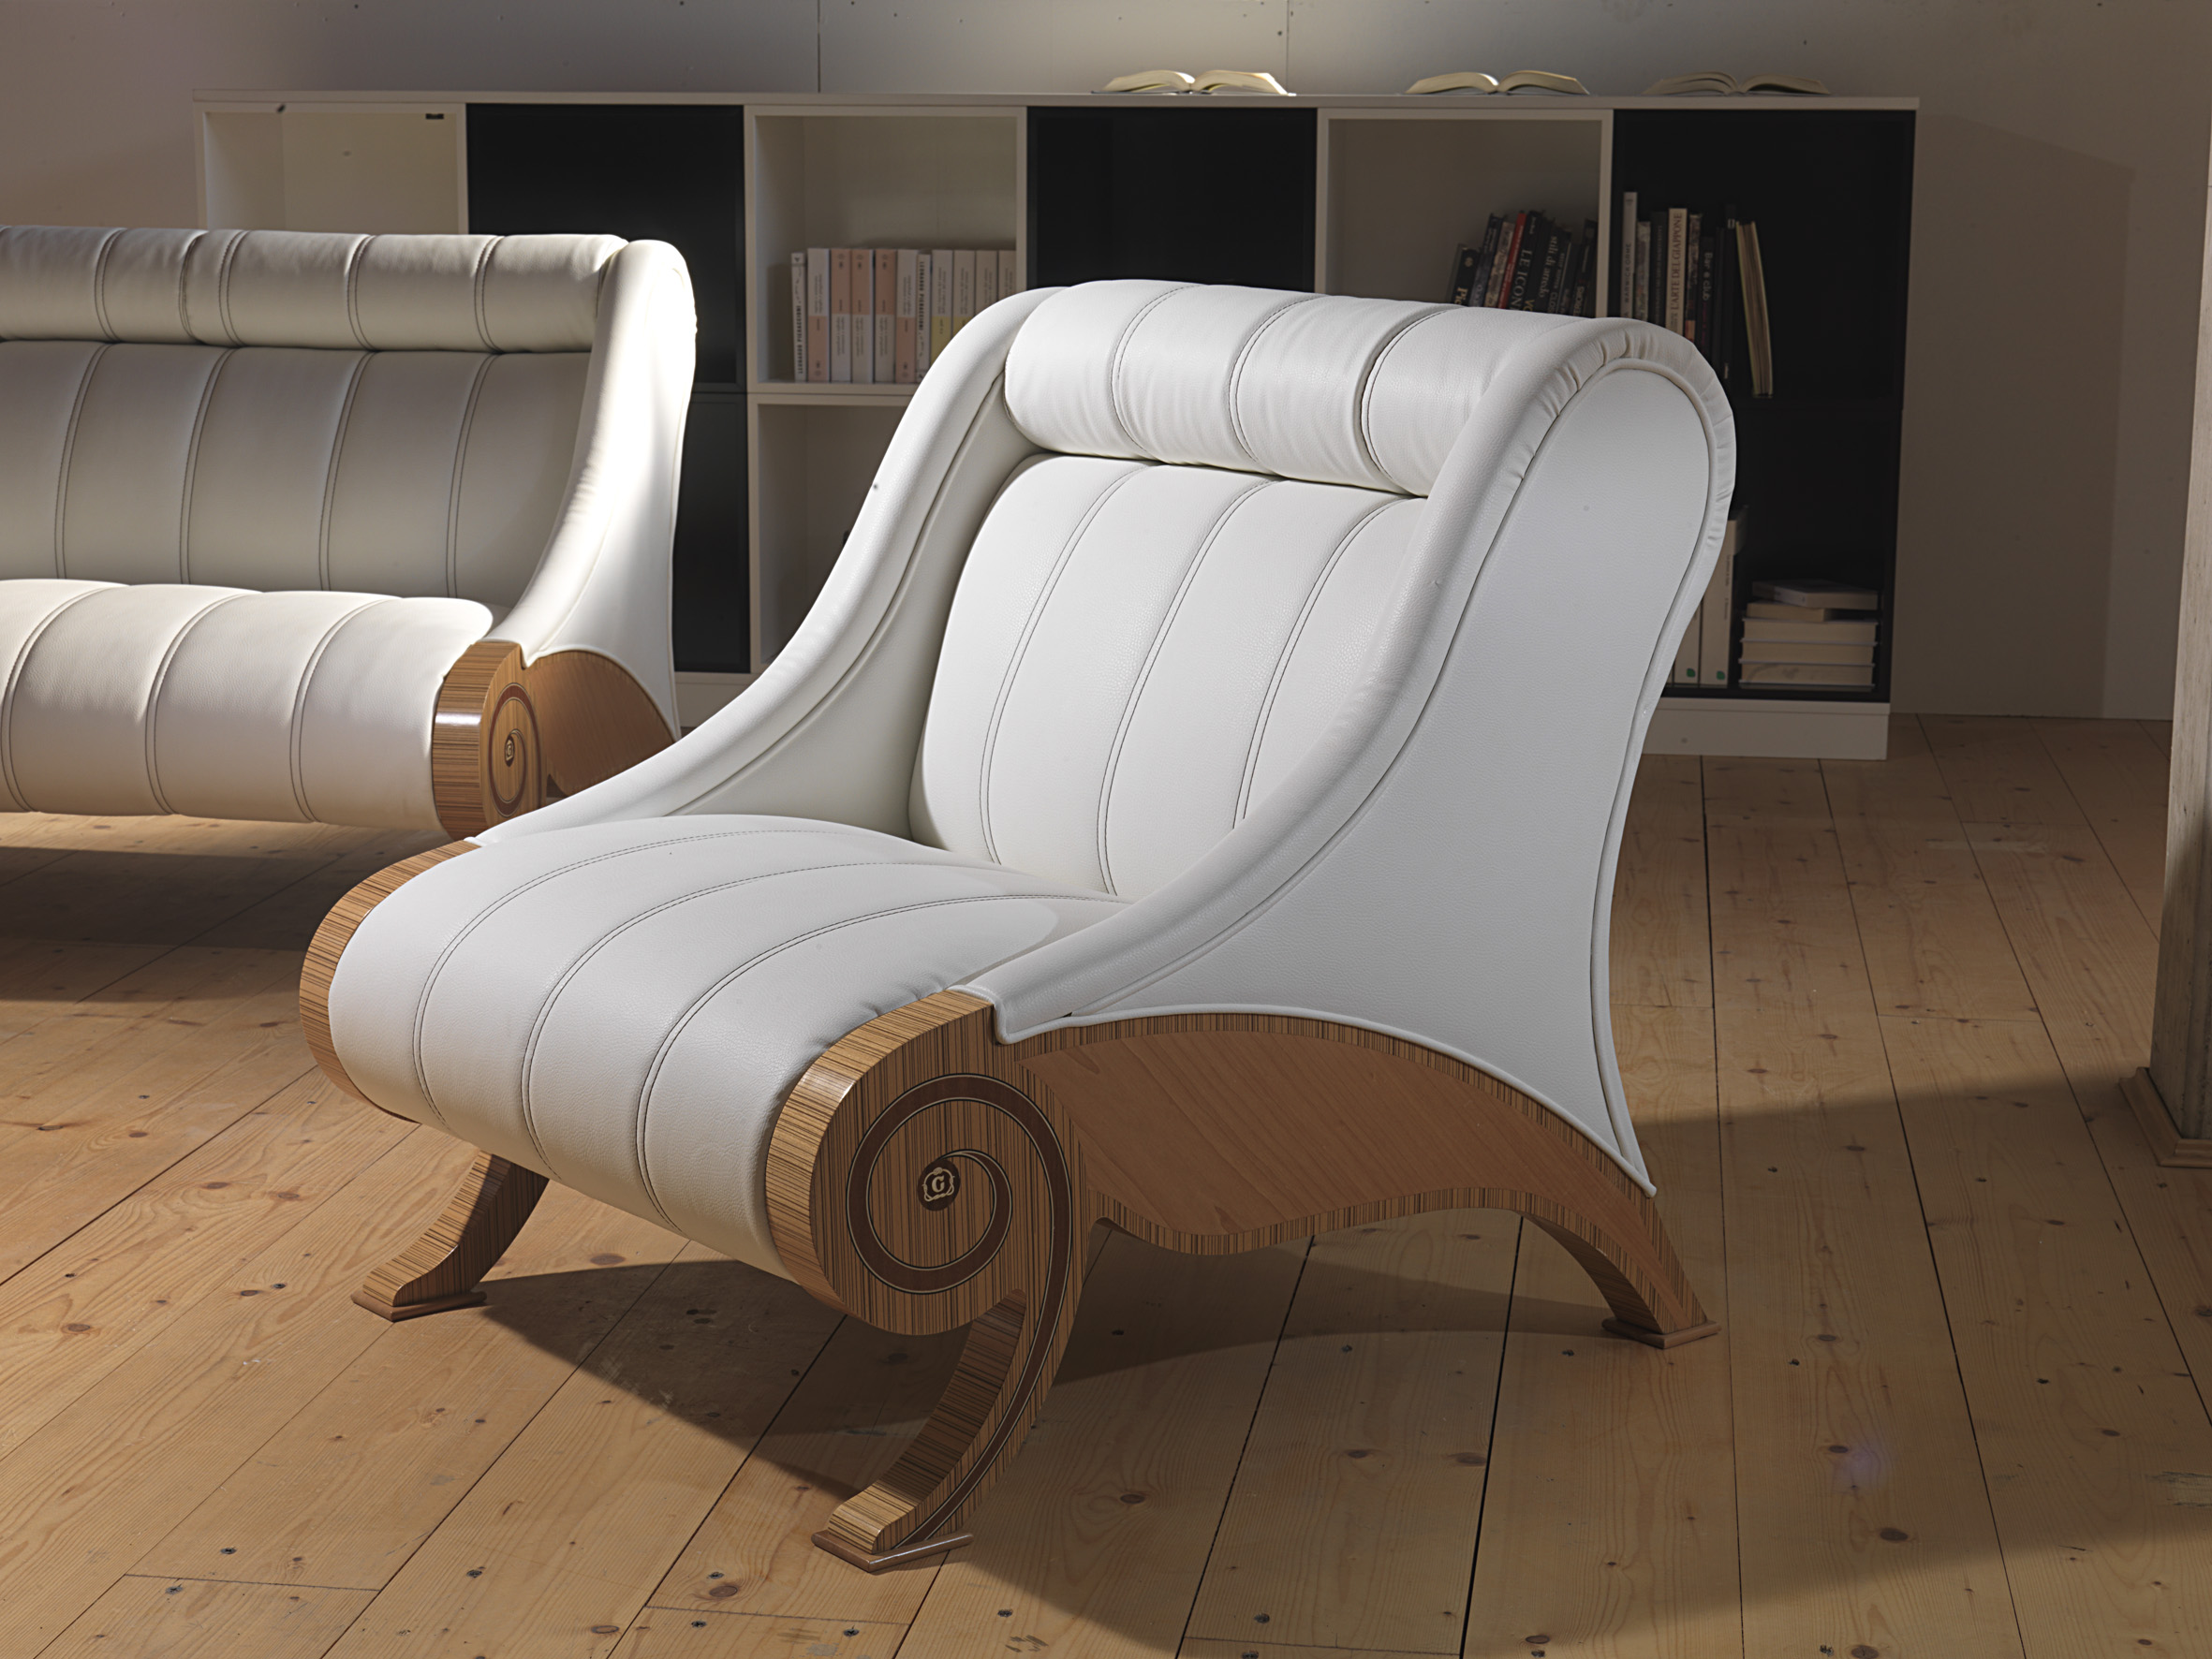
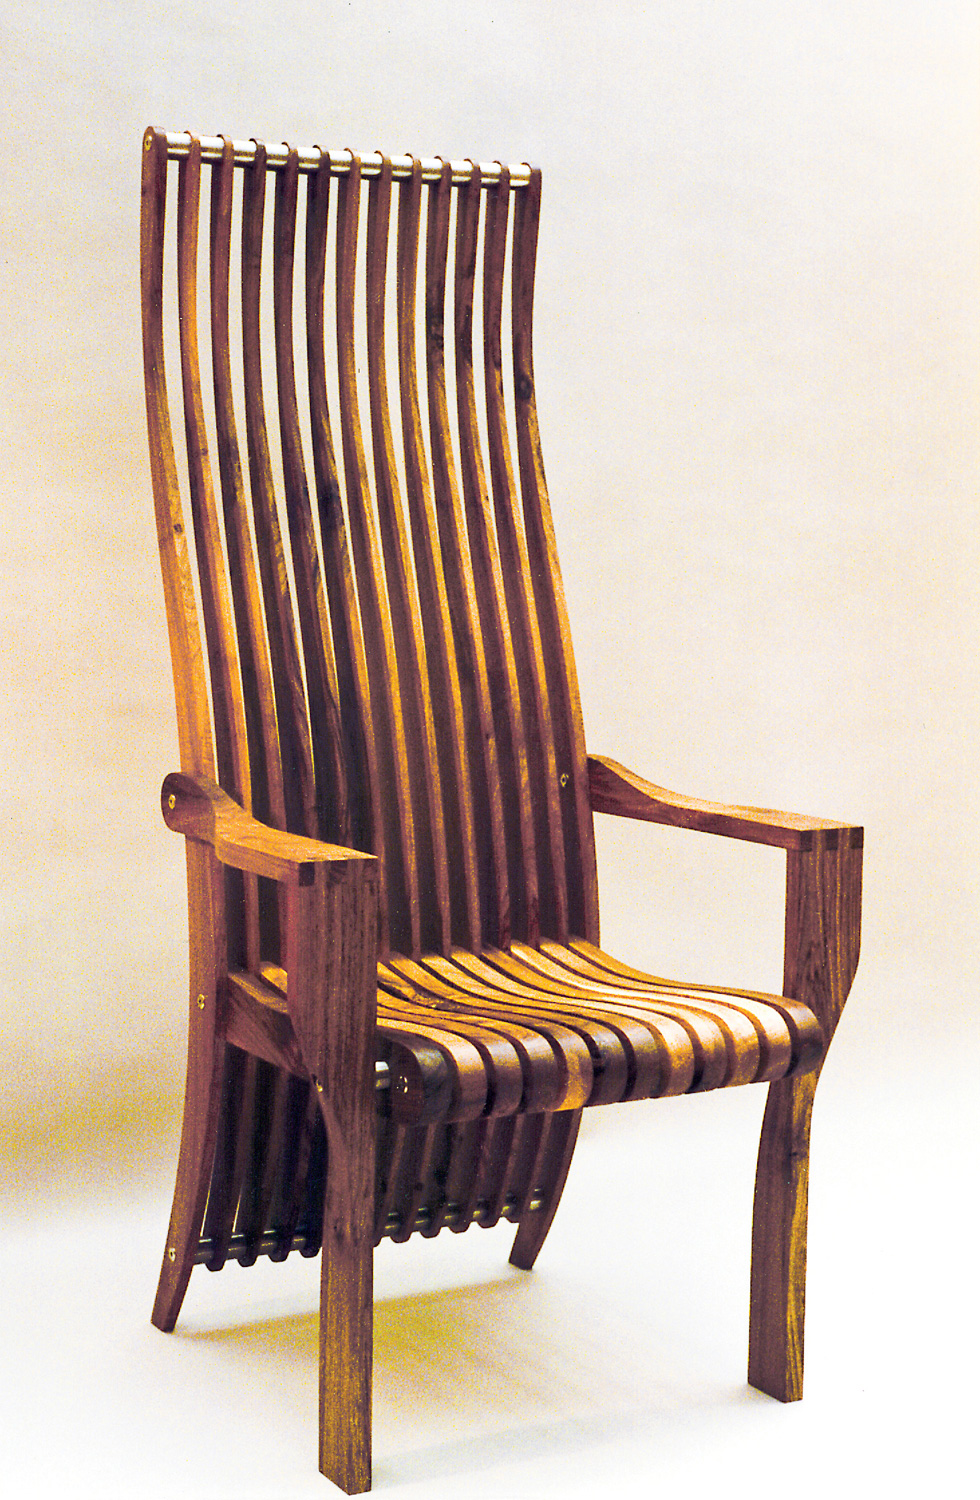
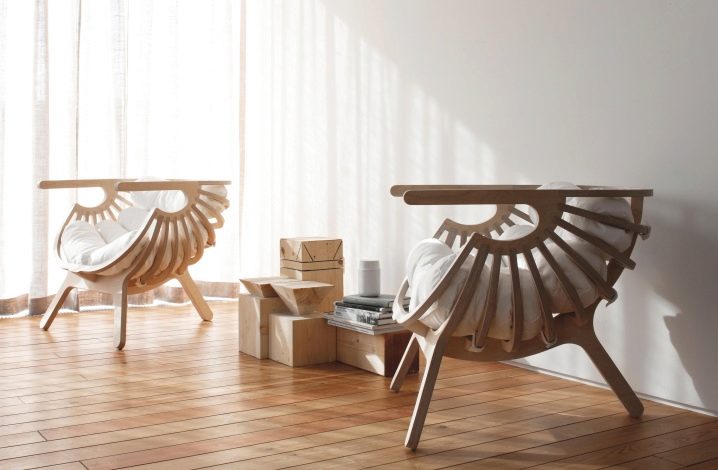
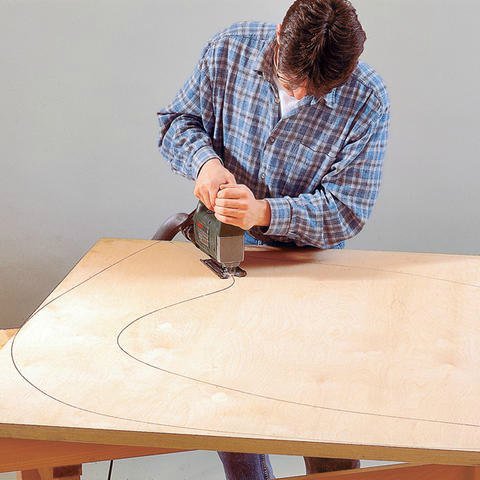
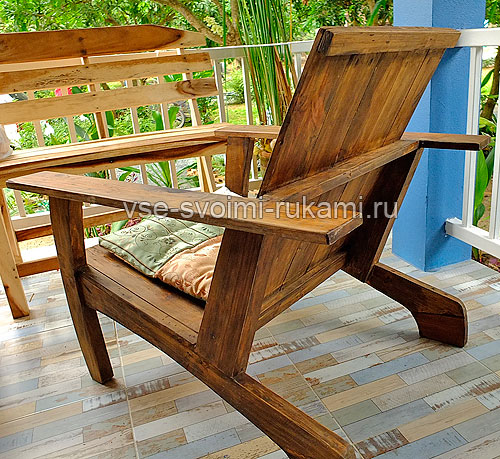
The ideas of the handicraft often transform into a search for ideas for creativity. For an hour, you don’t need to say anything, you just have to look around at all sides. At the house, which we knew, being on the vіdpochinku, there were such wooden armchairs. I couldn't just leave it like that. To that she took a line, papier, an olive, and she measured the armchair.
Boards for the backrest and the seat can be taken 1.5 cm or torso, for example 2 cm.
Fastening is fixed in the groove, but it is possible to fasten the details with coils, fixing them with wood screws. Doshki on the back of that seat are also fixed with screws. Tse nadіynіshe, nizh beat flowers. Also, for fixing the main nodes of the frame, you can twist the furniture screeds, open them in front of them.
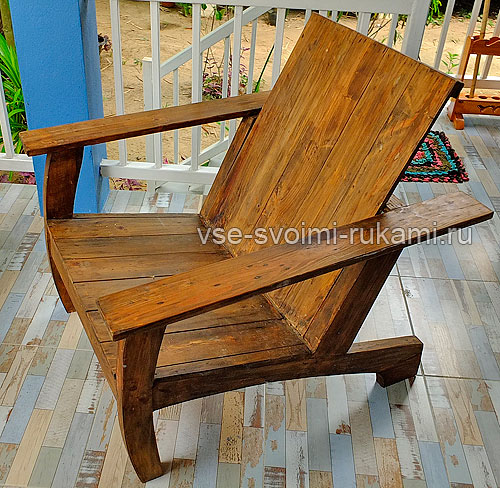
Armchair on the side. In the photo, the legs and the lower crossbar, which you carry, vykonanі z vagin, but you can, for simplicity, virіzati їх without any vyshukuvan. Such design options I also zustrіchala.
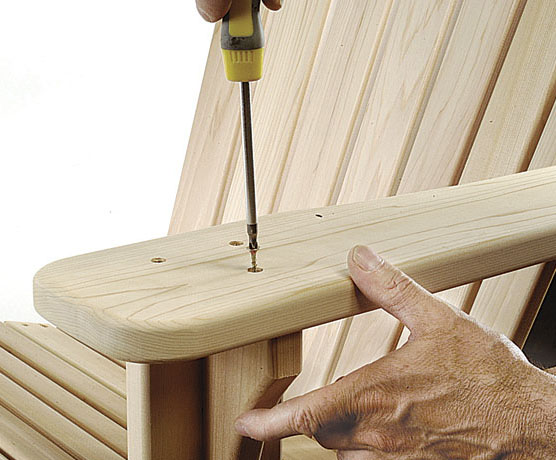
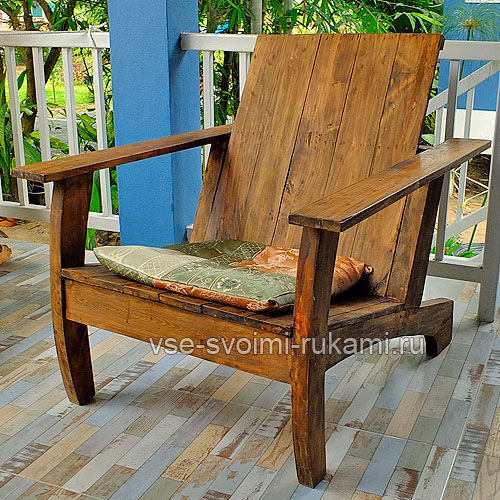
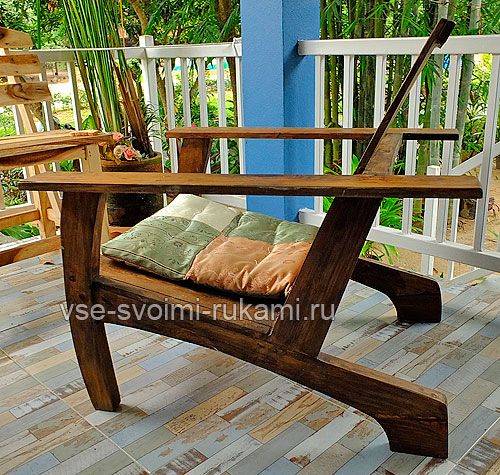
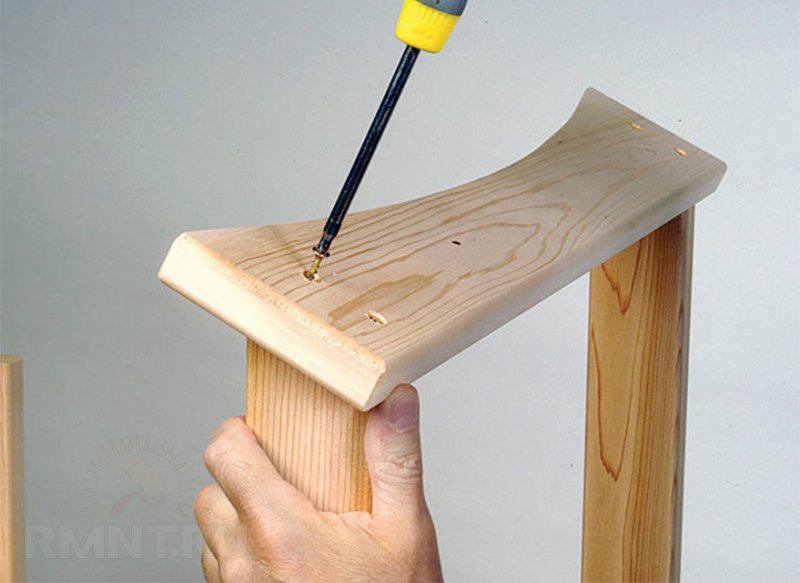
On this photo you can see how the back board was fixed.
After that, as soon as an armchair is chosen, it will be necessary to cover it with a warehouse. Stain, and varnish to the beast. For the softness of the seat, I recommend placing a pillow.
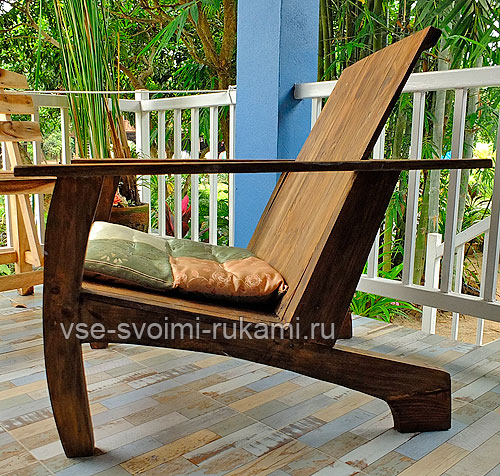
On the vіm, navіt yakshchito derevyanіnі surfіnі without pokrittya, on the verandі, pіd zahistom dahu or in altansі, pіd navіsom, the tree will be at the vіdmіnі stanі dovgi roki. Well, if you plan to leave the furniture on the open patio, then shorter solution- Lacquering.
Have a good vіdpochinku!
Wooden armchair - side view
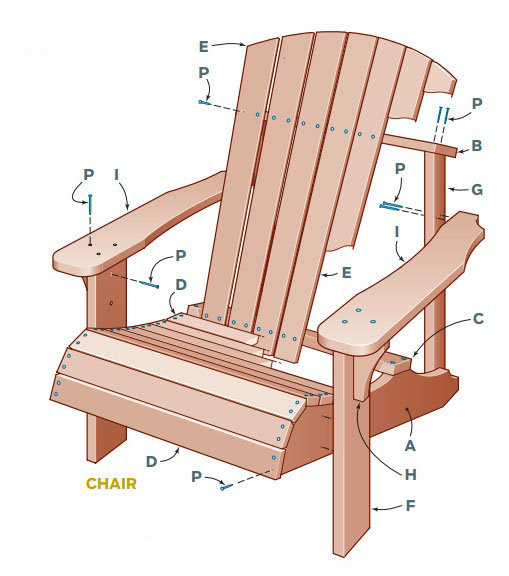
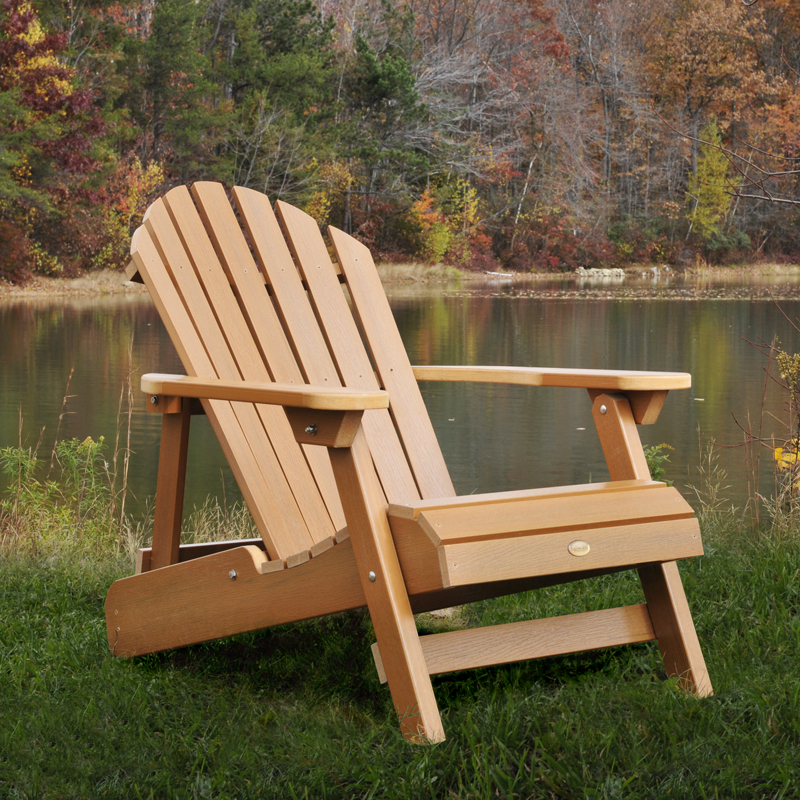
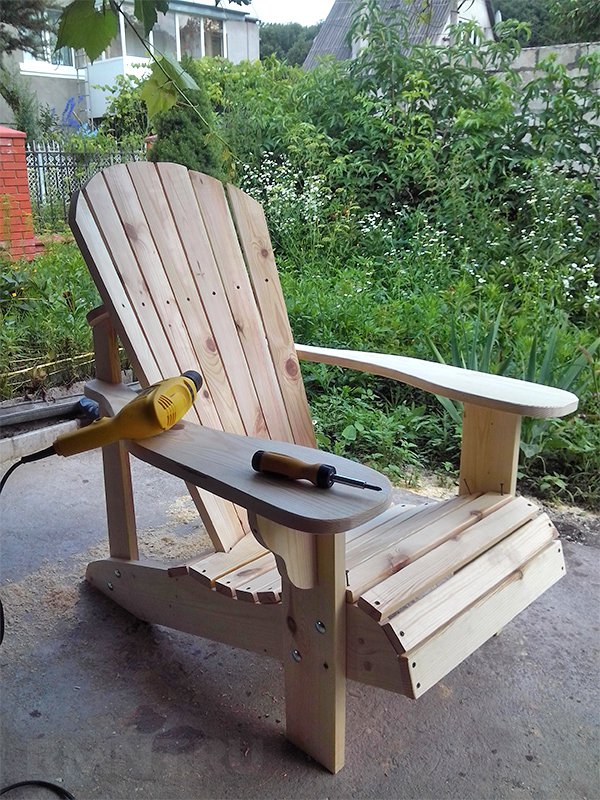
Do-it-yourself Adirondack armchairs have the option of making the chairs to preserve the design features, and also to ensure important carpentry work. It will be clumsy to repeat the project, having built the wooden details according to our armchairs and choosing the screws for additional screws.
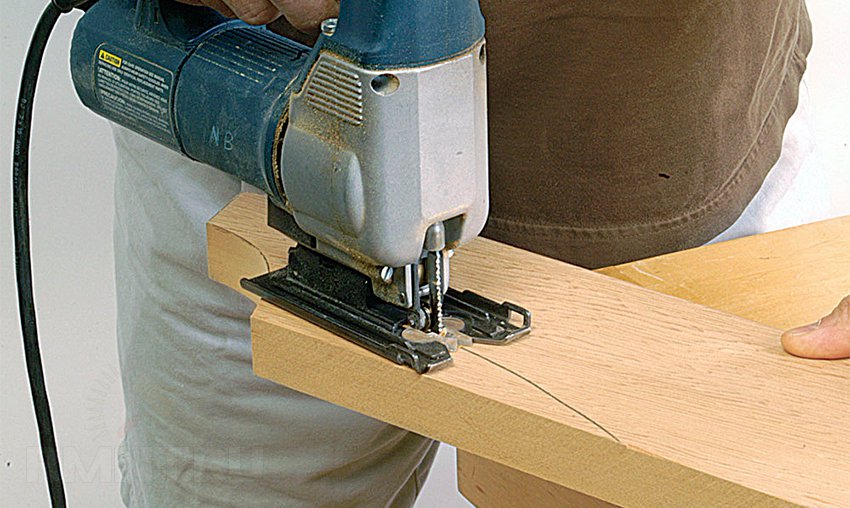
In the robot, there is a planed 20-mm plank made of pine, galvanized screws 4.5x40 mm, bolts 10x60 mm from a square headrest and nuts from washers. An electric jigsaw and a grinder will speed up the process, and a manual milling cutter will allow you to carefully round the edges, and all workpieces can be cut with a great knife, and I can manually remove the scuffs with an emery paper.
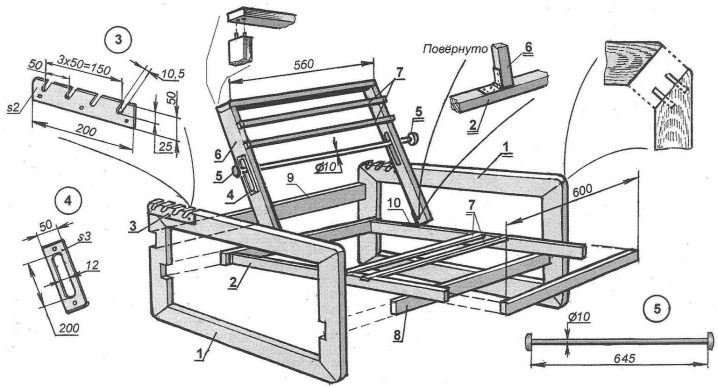
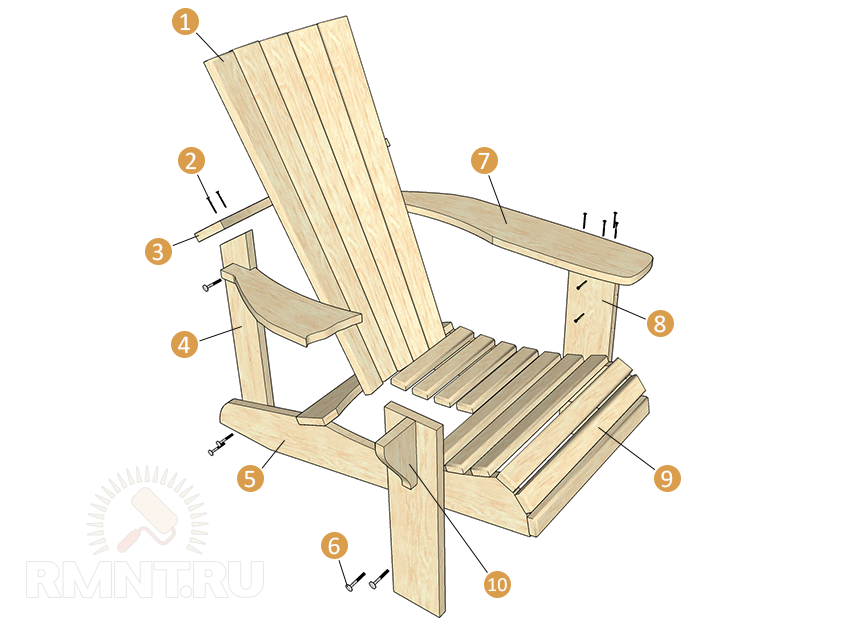 Vlashtuvannya armchair Adirondack: 1 - backrest bar; 2 - screws; 3 - upper cross; 4 - lower back; 5 - bichna support (spar); 6 - bolt; 7 - armrest; 8 - lower front; 9 - seat bar; 10 - arm support
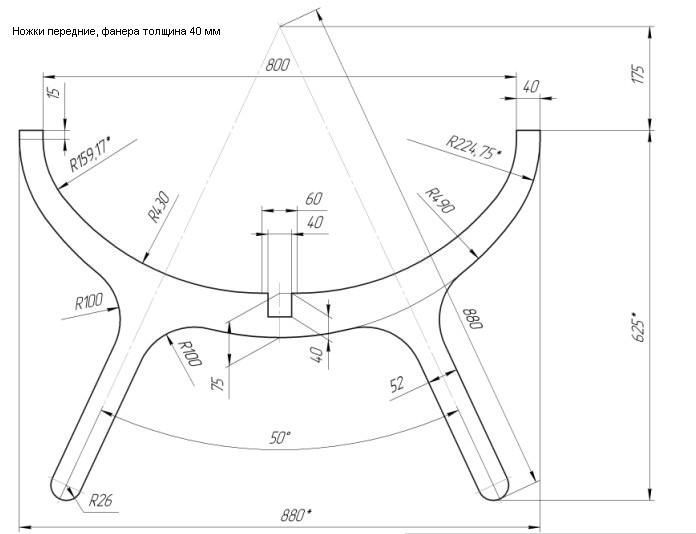
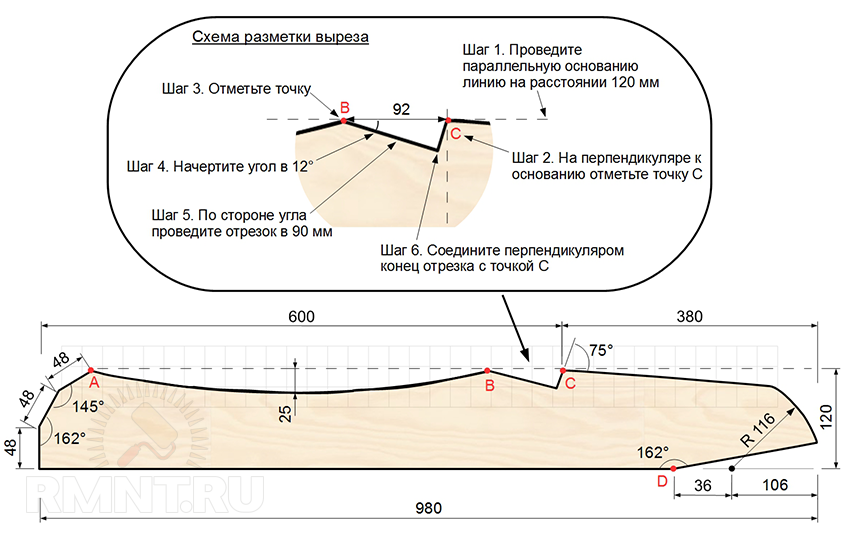
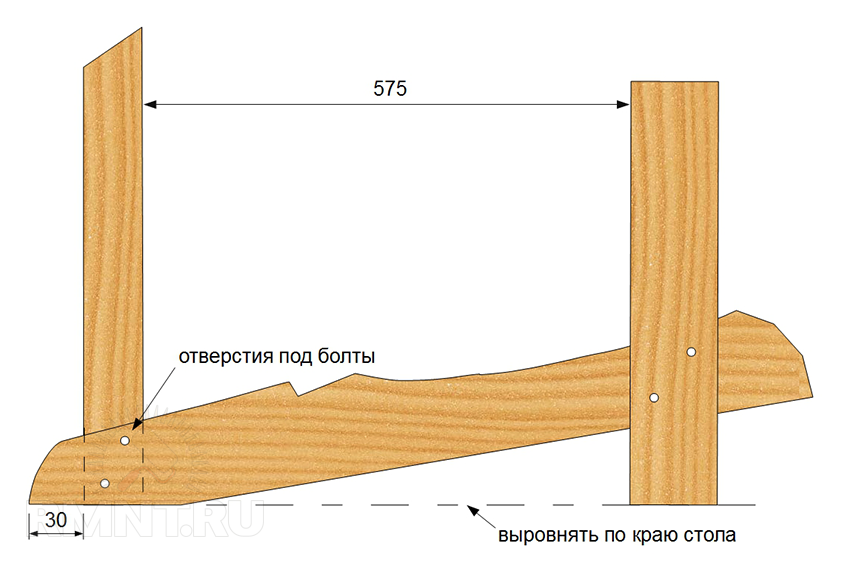
The largest folding elements of the chair are the two side supports of the seat. Zrobіt for spars povnorozmіrny vіzerunok on paper.
 Armchair with a bichno support
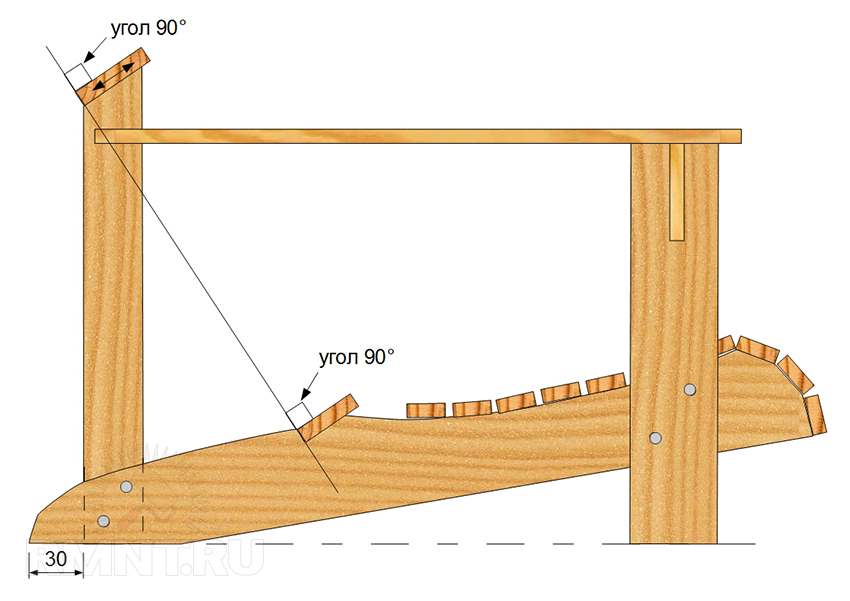
Cross the bottom side of the part, raise the first perpendicular ridge and two more folds to point A. Designate point C and mount the cross tie across the screed, as shown in the diagram.
Cut the cut 75 ° from the top of C, continue the line of the lower side. Anchor an arc with a radius of 116 mm;
Make a rounding between points A and B, making a square grid or improvising a pattern like in the photo.

Expand the pattern on the doshtsі, unikayuchi great knots and overflowing with drіbnі filed at the edges of the blanks. Draw around the contours and file the details, vicorist on straight cuts with a saw, and circle the curly shapes with a jigsaw. Keep the blade of the tool straight ahead of the fibers, so that the wood is less chipped.
Transfer the other elements of the armchair to the boards of the armchair, the vicorist pattern, or the armchair directly on the blanks and mark the next identical detail according to the first one.
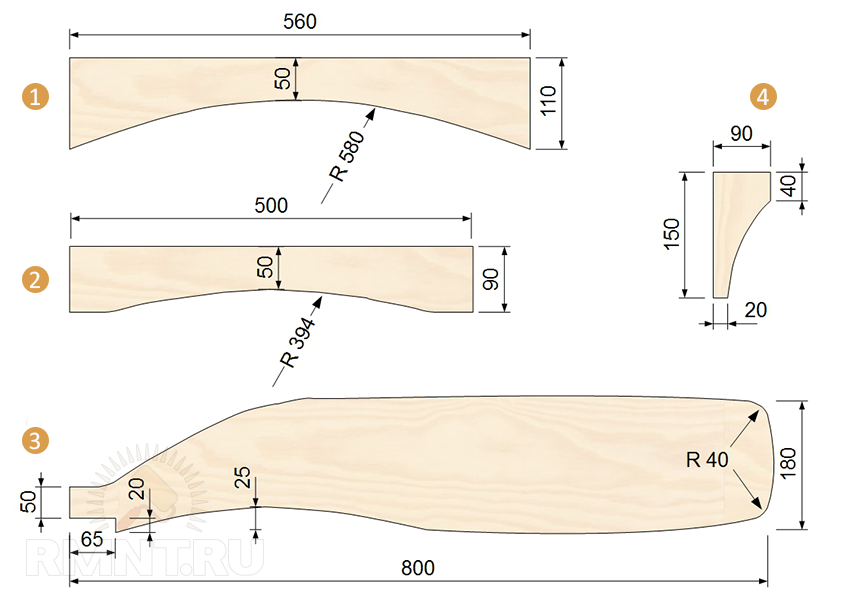 Armchair details: 1 - upper straight on the back; 2 - lower cross-section of the back; 3 - armrest (2 pcs.); 4 - emphasis of the armrest (2 pcs.)
The shape of the rounded feet is not structurally important; For another detail, mark it mirror-like, so that when sawing, the chips were studded at the bottom of the workpiece.
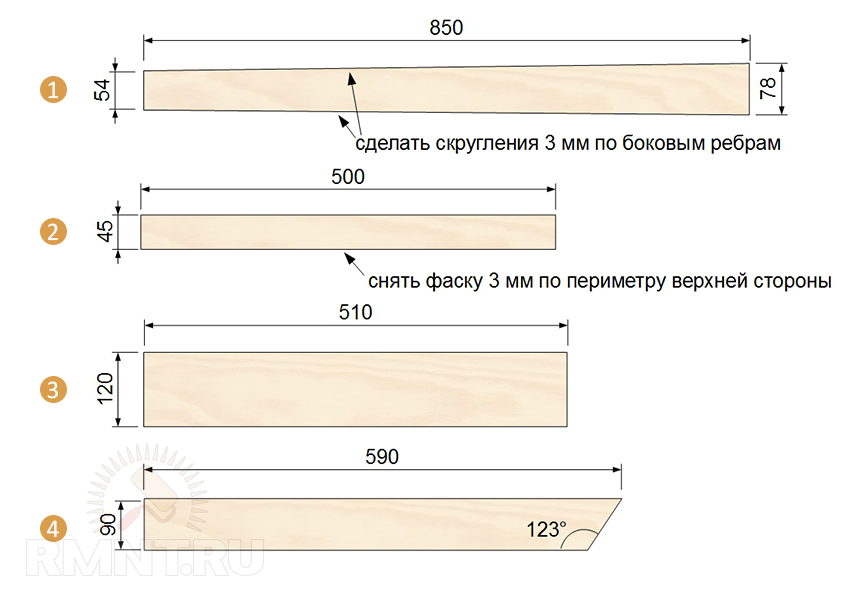 Armchair parts: 1 - backrest bar (7 pcs.); 2 - seat bar (8 pcs.); 3 - front leg (2 pcs.) 4 - back leg (2 pcs.)
Sand the ends, if possible, one by one the same workpieces at once. Mill the edges of the upper surfaces of the padlocks and the slats of the back, or just grind the top ribs with a grinder.
Wooden furniture will forever mend rot from the nodes of the plant, internal surfaces which it is impossible to make on a ready-made armchair. Therefore, cover the details before picking up with 2-3 balls of antiseptic.
Most of the components of the armchair are fixed with screws, which guide the opening under them are screwed with a combined countersink, selected according to the tovshchina of screws. If you want to attach droplets, they gnaw them and close them with crusts-stubs for glue.

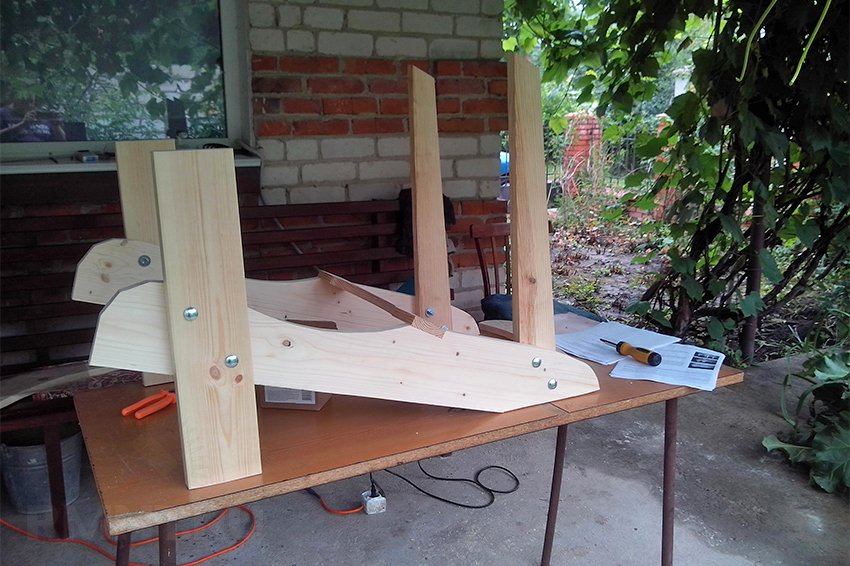
Put an unusable plate on the table, and place a lion support and front foot on the beast. Check the workpieces from the chairs, mark the drilling points.
 Scheme of choosing the side of the armchair
Open up the bolts and creak the details. Install the back leg, spreading it perpendicular to the bevel of the support. Similarly, choose the right side of the frame. Rear the side parts of the armchair with the lower cross-section of the backrest and the first plank of the seat.
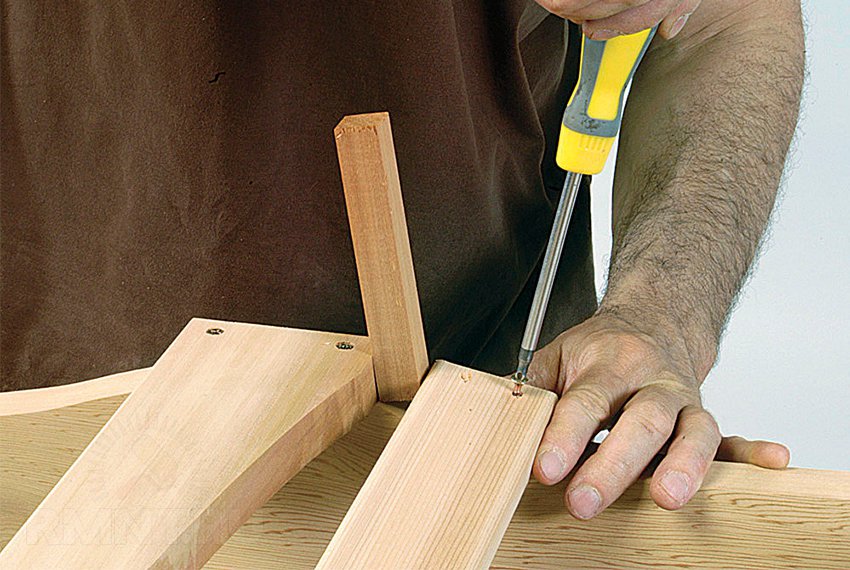
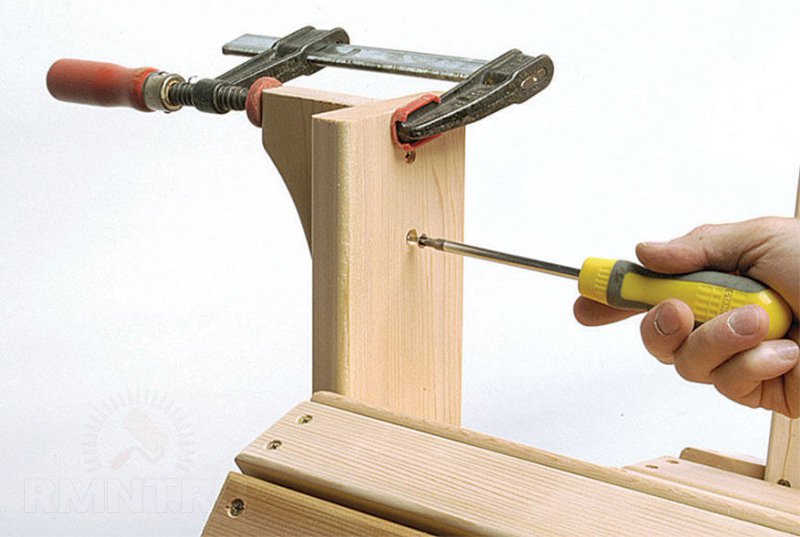
Install piping on the front legs, fix with clamps for stability. Screw the pads with screws.
Close the top straight of the back, bending along the bottom cross. At the same time, you can correct possible inaccuracies in the layout and uneven cuts that have accumulated by the millimeter.
Small wiggles are used by the sound of the upper cross-section and under it. At the extreme slope, twist the lower crossbar and bend the viriz.
Mark the middle lines on the transverse planks and the central back plank. Fixing the rest on the mountain with a hand, or squeezing it with a clamp, twist a straight opening and burn the bottom screw. Reverse the vertical position and close the top of the rail.
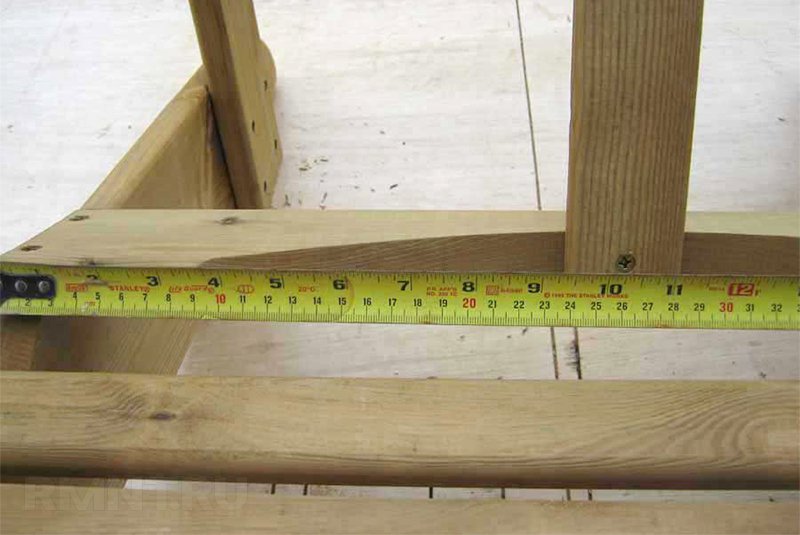
Screw on the line-by-line strips with a equal interval. Take a skein and tie one knot to the olive, and the other to the flower fastened to the stick of the seat and back. Carry out the radius of rounding, cut the planks according to the cut and sand the edges.
Having determined the width of the remaining rail of the seat, put it on the table. Take a look at the chosen armchair and sand the traces of the markings, if there are any other defects. Seriously grind the upper surfaces of the backrest and seat details.
Cover the wood with oil seeps, as if you want to preserve the natural look. Vykoriv glaze on synthetic resins to create a color opaque surface.
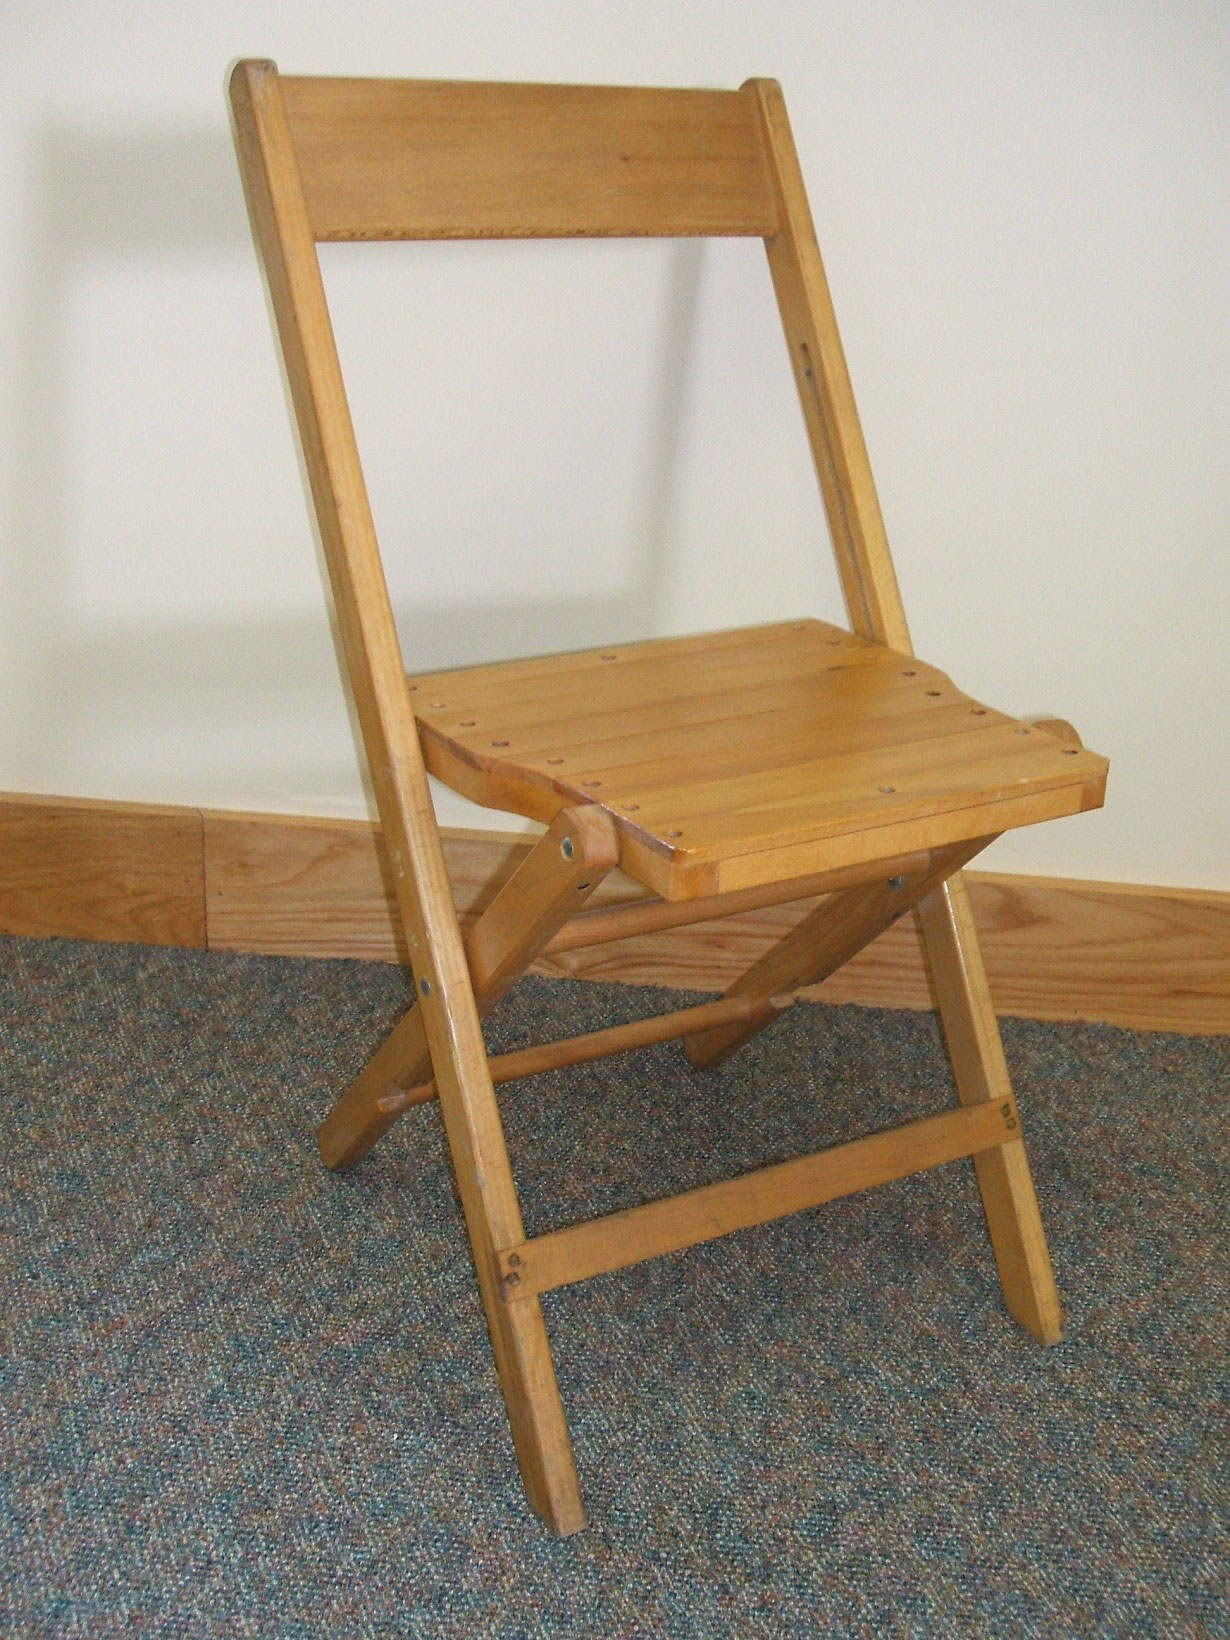
The whole garden chair of the simplest design and the floorings are simpler to make with your own hands, so that for the first time you can see the people who are not known in carpentry robots. Learned chairs with roses, simple materials that were left behind after everyday work, and primary tools to help you build such an armchair in just 2-3 years. If you need simple instructions, you will need to cut a number of elements into the rozmіr, open and drill open, and then pick them up as a constructor in one whole.
And now let's get started and prepare for the work the materials and tools needed.
Dali, at the armchairs below the rosette of the board, the preparation of the garden armchair was optimal, tobto. for example, if you take a standard plank of 100x50 mm, then you cut it with a planer and at the exit you take approximately the optimal size of 95-90x45 mm, otherwise. I think that here a sprig of millimeters, plus or minus, does not play a big role. All the same, it’s not going to be underwater, it’s not necessary to be afraid of it, boldly take a tool and start practicing!
And I will help you with a chair, u.
Armchair 1. Armchair elements from boards 90x45 mm.
![]()
Armchair 2. Elements of armchair from boards 90x20 mm (inch).
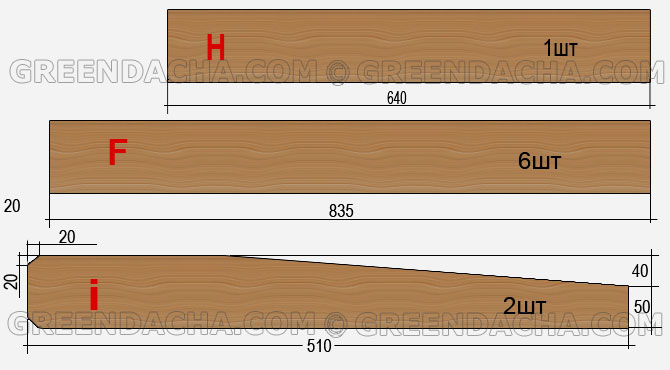
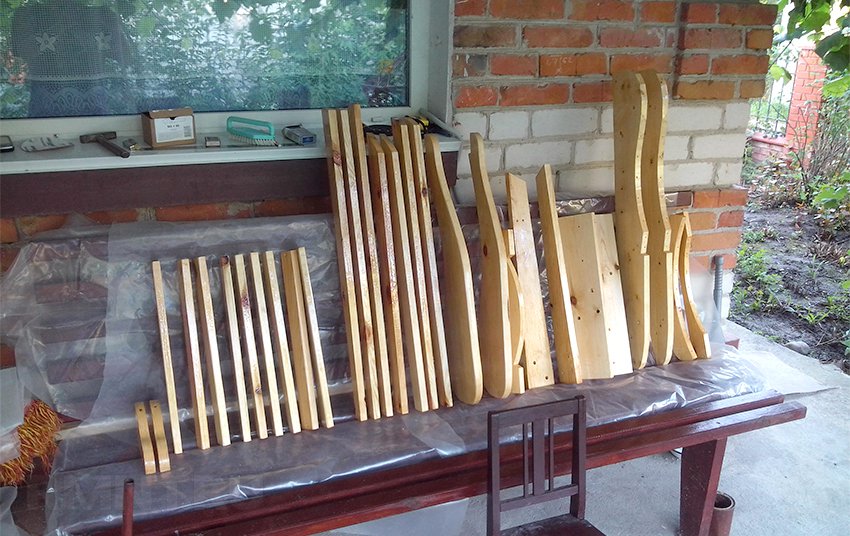
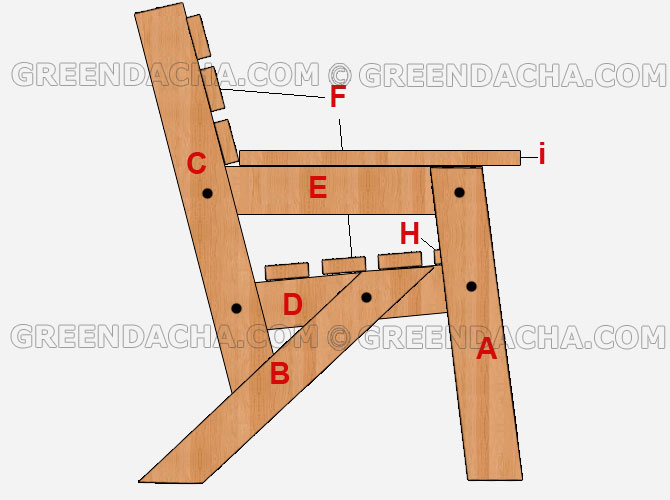
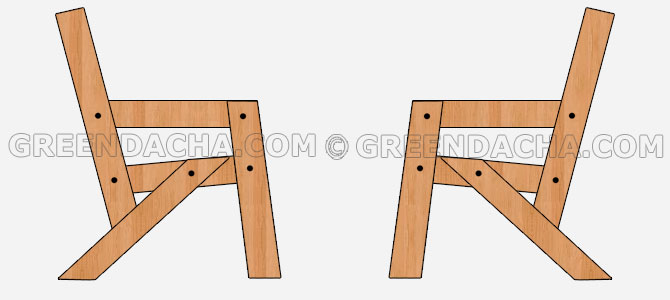
Armchair 3. Armchair elements at the collection (sidewall).
1. For the spadix, we cut all the elements of the garden chair and, after opening, drill in them, with a drill with a diameter of 10 mm.
2. Now it’s necessary to work them with an abrasive cloth, so that the farthest rubbish injuries and rocks can be hidden.
3. Choose two sidewalls of the armchair, like a mirror image of one of the other.
4. Fix all elements with bolts, washers and M10 nuts. Bolts are better than vikoristovuvati furniture with a flat droplet.
6. Now it’s too late to apply seepage, farbi or stain with varnish. Do not forget about the dry season.
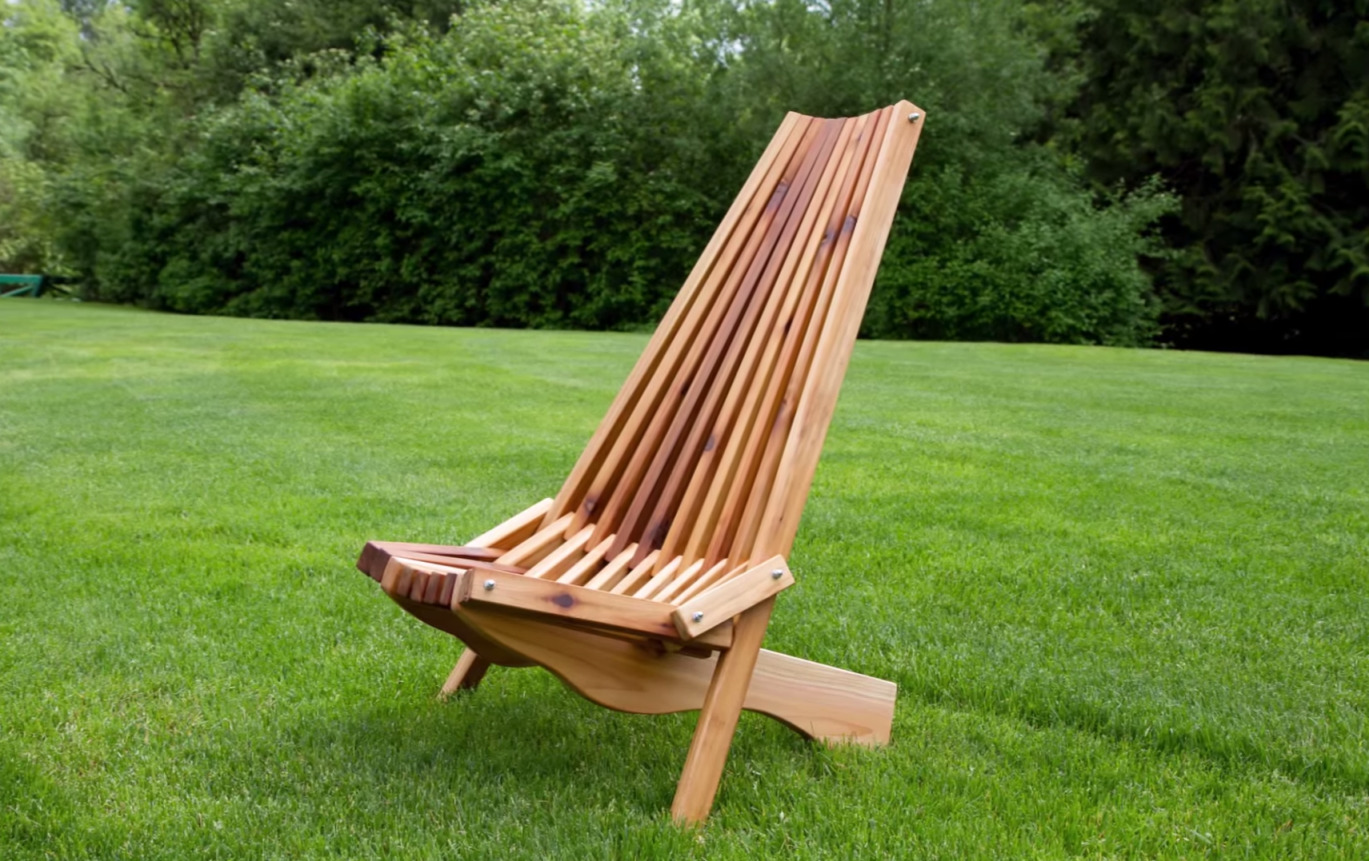
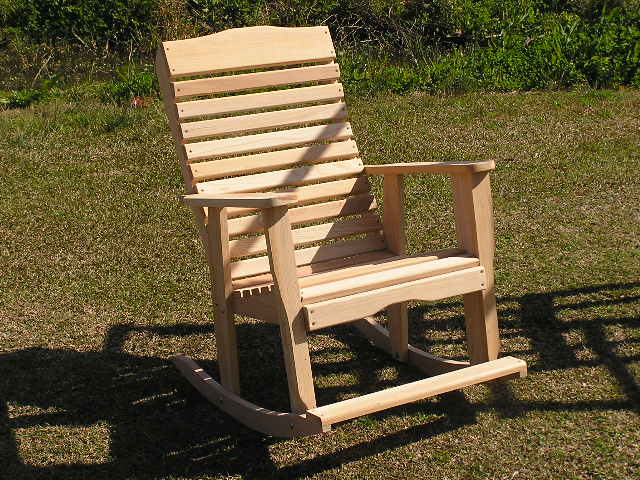
The chair is ready!
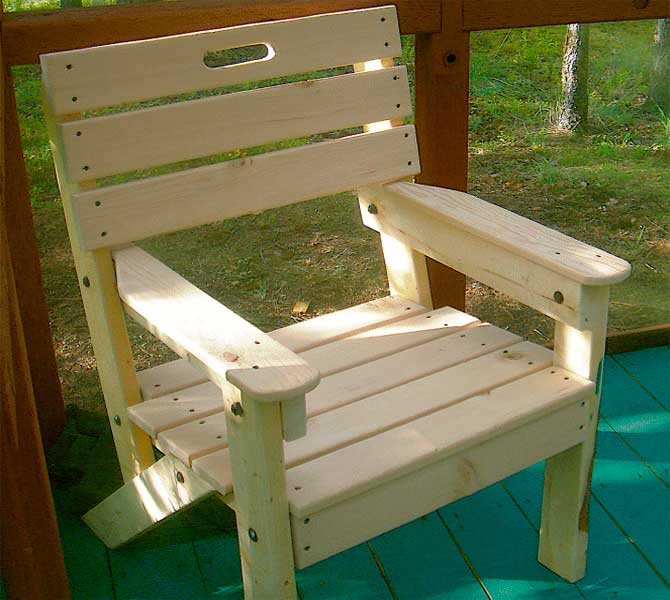
Wait, nothing fancy. You may be able to finish a suitable armchair for repair in the garden.
If you want to add an armchair in a set with such a garden bench, then you can also have a flower combination.
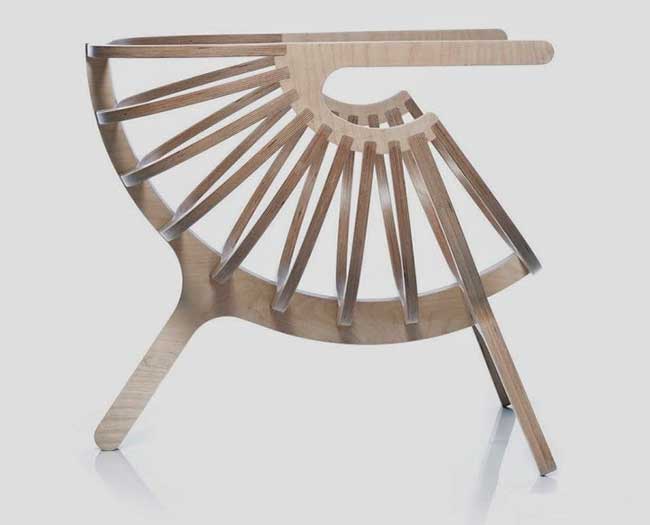
Below in the photo, marvel at the different options for this chair according to different authors, maybe you will come up with an idea, how to add a special feature to this simple design.
The axis is such a cіkava interpretation of a garden armchair with vertical elements of the backrest at once from a small table.
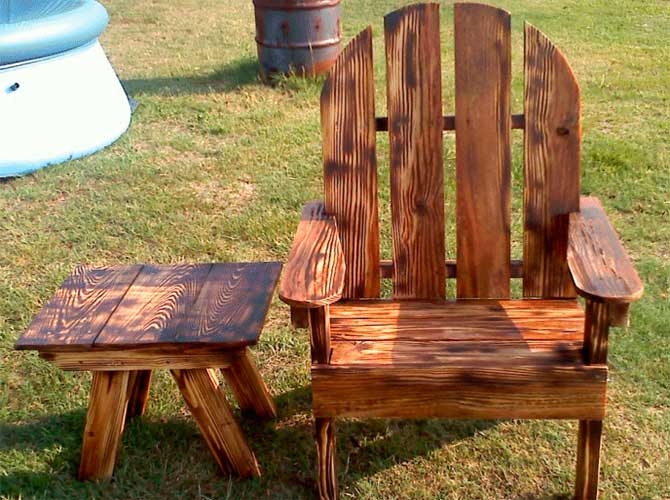
Even the author’s original extension is to add additional straps to the seat and back of the armchair, and also to increase the support for him, so that at the same time to serve as an additional support. The armchair is tinted with wood stain and filled with varnish for the beast.

Force your work to me in the mail, or leave it in the comments, and the stench will be published ob'yazkovo.