On the basis of our post-approval to the site, we publish a small article on how to install and install the HASP-driver emulator for robots 1C 8.2 for Windows x64.
We will also analyze the installation and configuration of 1C 8.2 with demo data.
Validity is guaranteed with a fully clean licensed Windows system (Windows Vista x64, Windows Server 2008 x64, Windows 7 x64, Windows Server 2008 R2 x64 including Service Pack 1 installed)
Installed by the local administrator!
1) You can see the old license manager and HASP driver (Control Panel -> Programs and Components). You can also see all the old emulators and platform patches.
2) Vymikaёmo Control oblіkovih records. Start -> Cleanup panel -> Change parameters in Cloud Records Control. We set the meaning of "Never remind" (call down).
3) Installing 1C (platform) with HASP driver or Installing HASP driver version with x64 support:
4) Dumps are brought in (the registry key with dumps has changed) - the “Dumps” folder, run it and add the file to the registry "v8 50 user.reg" for the working station, for the server, you need to add all the files to Dads "Dumps"- archives for zavantazhennya at the bottom of the article.
5) Run install_certif.cmd(Installing a special certificate emphasizing Windows test mode) if you don't want to hit F8 right away at startup.
If so, your OS is guilty of getting into test mode - if it didn’t happen, then it’s necessary to press the F8 button when restarting and select Test mode to be able to install drivers with unsigned certificates. The test version is tested for installation into the system of non-signed device drivers with a certificate. The certificate is issued by Microsoft after the administration, the release of the driver, I will add a builder (ownership), for testing in the Microsoft laboratory. It is absurd that there is no certificate for the driver-emulator and it is impossible to delete the test version.

Verification: at the bottom right corner of the Windows desktop, it may be written in white letters "Test version" of Windows 7 ???
If there is no help, then, as an option, you did not turn on the test mode, then point 6 may not pass.
You can run the bcdedit.exe /set TESTSIGNING ON command from the command line and re-configure it.
It is also necessary to repeat all the patches, HASP emulators found in the system, and re-run step 5.
The test mode may not work, as Windows already switches to a different mode, for example, "Theft mode".
Deyakі Windows activators to transfer the system into stealth mode, schob niknuti aktivation mechanism.
In this case, you need to remove the activator and/or upgrade the activator and/or get a licensed product.
Do not forget to turn on the anti-virus, its components often block the installation of drivers.
7) Install the driver
Control Panel -> Add Hardware -> (Control Panel -> Device Manager)
Add a new hardware device ->
Install the old attachment ->)
Install the hardware that I manually select from a list ->
list manually ->)
Show all Devices ->
Have disk -> (Insert from disk ->)
Browse -> (Oglyad ->) way to the directory, with files vusbbus.inf, vusbbus.cat, vusbbus.sys
It says "Yes" if you see a request to proceed with the installation of unsigned drivers.
8) Device Manager -> System devices may appear "Virtual Usb Bus Enumerator"
(Appliance Manager -> System Appliances)
Respect. After installing the “Virtual Usb Bus Enumerator” driver, the “USB Controller” will have an additional possession
"Aladdin HASP key" or analogue of "SafeNet key"
Aladdin USB key
either after re-advancing or after pushing Diya -> Update the configuration of the possession 
Revising. On the pictogram I will add the Virtual Usb Bus Enumerator is not guilty, there is a hail sign. Prestriy may be normal.
9) Installing the HASP LM driver (TILKI for installation on the Windows Server platform). In the archives - at the bottom of the article.
9) To enable the notification to the working style, "Test version" must be installed "RemoveWatermarkX64.exe". In the archives - at the bottom of the article.
Also, it is necessary to protect the 1C platform from accessing the Internet (firewall or a third-party screen).
On which all 1C Submission 8.2 is installed that practice.
Tse report instruction By 1C configuration setup that creation of the 1C data base (from the installed configuration). Do not forget what you need to install the 1C platform. Installation of computer configuration 1C. Creation of data base 1C configuration. The creation of databases 1С із CF. The creation of databases 1C iz DT.
Configuration 1C- Tse template. On the basis of this template, the 1C data base is created. The number of 1C databases with one 1C configuration template is fixed.
In this rank - the essence of the installation of the configuration 1C - the creation of the basis of data.
You can create a database in the following ways:
— Install the configuration (template) on the computer and create it on a yoga basis
- Create an empty base and get to it CF
- Create an empty base and get to it DT
- Add 1C SQL database backup to your database and add it to 1C server.
CF and DT - the configuration vivantage from the basic base. Only one type of one team is allowed, that DT includes data, and CF does not include (remember only the information about the configuration).
The configuration distribution kit is expanded on the disk (select the Install menu item for installation) or as an archive that can be self-extracted via the Internet (unpack it in any place and press setup.exe).
Installing the 1C configuration distribution kit, install only one food - the installation directory. For locking, the 1C configuration is installed in the templates directory.
Tse typical catalogue. For 8.1 you can find it in "C: Program Files 1cv81 tmplts", for 8.2 in C: Users Im'ya Koristuvach AppData Roaming 1C 1Cv82 tmplts.
Change the catalog to your own: 
As a result of the installation in the tmplts directory, a folder with the installed configuration will appear. My dad has folders of installed templates in configurations. They have documentation and “additional things”. The structure of the tmplts folder and the description of the files in the distribution kit configuration can be seen for example statistics.
The configuration is stored in a directory on the disk (the file version is considered by us on its own).
It is necessary to select a place on the disk, where we will create a configuration, for example "E: My_docs \ 1C \ baza". Let's go or create this folder and create it in the data base folder, for example: "e: My_docs \ 1C \ baza \ torgovlai-dla-fop".
We start 1C. Click the button to select the data base Add.
Select “Creation of a new information base” and press “Dali”. 
If you have installed a configuration from the distribution kit (one inch), then at a time you will see a list of installed configurations. Skin configuration options available:
- Name of configuration/version
- Im'ya config (demo)/version
The first option is a clean empty data base. Another option is a database with demo data for learning. We choose another option (put the cursor on the version number). 
Enter the name of the base of the data, there may be, be it as you understand. The name itself appears in the list of databases when entering up to 1C. For example, "Trading for private enterprises in Ukraine (DEMO)" 
It is necessary to choose the local data base. We install the file option, so select "On which computer ...". If you install the client-server option, select "On the server 1C". It is necessary to choose a catalog that we have prepared for the data base. Vkazuvavsya earlier when installing 1C. Our viewpoint is: e:\My_docs\1C\baza\torgovlai-dla-fop
After that, we need to install the installation without changing: 

 "Configurator"
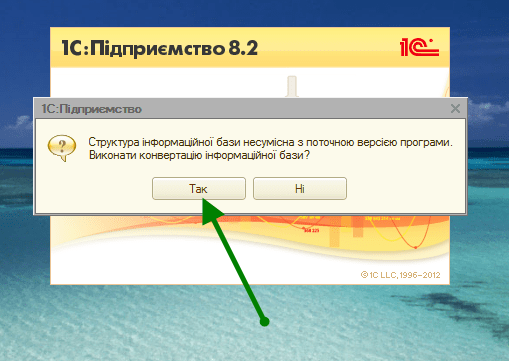

1) folder "1c" - configuration templates of the company 1C
2) “Configuration name” folder – English configuration name (Accounting-Accounting, Trade-Trade Management, Hrm-Salary and Human Resources Management)
3) folder "Version" - configuration version
4) Folders and files to the configuration template.
For example, the path to the configuration template "Care for trade" version 10.3.9.4:
C:\Program Files\1cv81\tmplts\1c\trade\10_3_9_4\
1) Readme.txt - find the directory where to find it Axis and that's it, if you want to support ours - you have such a possibility: right-handed - options for donating to the development of the portal. Or share the article with your social networks through the services below. 1C, as if it were another program, vimaga, so that you can win over licensed versions. To confirm that the program was purchased officially, you need to win license keys 1C. In these articles, you will see the specifics of the keys to defending 1C, as well as giving you food allowances, which are often asked about working with them. 1C support the robot both with software and with hardware keys. Let's take a look at the report on the skin of these species: Software license 1C- the same file that is saved on the PC that takes part in the launch of 1C. If the file is activated with a pin code, then the launch of 1C will be set, otherwise (as the launch will be set earlier) you will need to enter the CIN, which is included in the delivery kit. The software key is attached to the hardware part of the computer, which periodically, when replacing the components of the computer, is brought to activate the 1C license again. Smartly program license 1C can be subdivided into 2 types:
One-time license
be installed with one PC and allow you to beat the 1C platform. When choosing a varto, specify that the number of configurations and information bases of the software key is not intermingled. It is insured for a rich coristuvachіv license
most often installed on the server (1C: Enterprise, terminal server, WEB server). When transferring a 1C-client to a 1C-server, the software security itself allows the same number of licenses and allows (otherwise it does not allow, as the number of licenses has been exhausted) pratsyuvati z 1C. With this variant, it means that up to 50 licenses are licensed on a large number of licenses. And if you want one license from a richly owned set of assets as a single-sourced set, then it’s impossible to get away with a license as a “set”. More nadіynym, but at the same time z timі and expensive way to defend 1C є hardware keys. The hardware keys (HASP-key) look like a flash drive and signify 1C like a past license. In some way, for software licenses, the PIN is saved on HASP, not on the file on the computer/server. !!! Varto support, scho fahivtsі 1C do not recommend the selection of the local key and the tethered key on one machine. When starting 1C, there will be identifications of the local key, and there will be no tassels, and with this, the tethers will not be able to "batch" the tethering key and, as a legacy, they will not be able to work in 1C. In times of work with a licensed for a rich coristuvachіv it is necessary that 1C knew about the presence of such a license in the merezhі. For tse vodpovida 1C license manager ( Hasp License Manager). License manager 1C for additional software security (included before the delivery set), without any insurance for a rich coristuvachіv license will not be correct pratsyuvati. If you choose different hardware keys, if you don't want to get 1C licenses, you need to switch over, so that the indicator on the HASP-key is flashing. This is an indication of what is assigned and the HASP key driver is installed. If the light is not on, try plugging the USB key into another USB port, or go back to the system administrator, it's possible that the driver does not have access rights to install the driver. So, first of all, change your mind, that the key of the required series is connected to the computer. remember that keys can block one another. HASP works behind port 475. Switch, on the computer with the key, on the computer running the program, port 475 is not blocked in the measure. You may be blocked by a firewall or an antivirus. The widest pardon of Windows XP. The driver will automatically start up more, the server will start up automatically. Zamіst server zahistu vykoristovyte License manager LMSETUP, which is installed, respect, like a service (Service) Windows! As an addendum, let’s say that with a 1C robot, two or more managers’ licenses can function at the same time, but in order to frighten the appearance of pardons, the skin manager can be assigned its own unique name. For which hacker file nhsrv.ini, you need to change the value of the NHS_SERVERNAMES parameter in the NHS_SERVER section. Moreover, it is necessary to tell the names of the skin copy of the running program. For this hack, use nethasp.ini: for the NH_SERVER_ADDR parameter, specify the ip-addresses of the servers, for the NH_SERVER_NAME parameter, specify their names in the same order in which the addresses were specified. If you still have the power to choose, upgrade, buy software and hardware, you can always contact our facsimiles for advice Technology translated to code 77 to 80. It’s a pity that the retailers didn’t follow the path of the seductive summation (wish I could). I’m also walking along the path! ; -) 1C allows you to convert the configuration 77 to 80, with which data bases, forms, layouts, application objects are transferred, but the code of the modules is not converted, because the fault is insane. 1C could trim the old and new code, so that it would be possible to step by step rewrite the important files by 80, overwriting the old and unprincipled ones by 77. Ale, sorry. Luckily, Anatoliy Fedkov's father came up with an idea for encoders, which I share with you. Vaughn polagaє in emulation code 77 vbudovanymi zabom 80. Fortunately, 1C mainly operates with objects, so there is also a simple way to go from 77 to 80, which few people think about. This way will help you without additional coding to achieve 80% conversion of the code.
It is necessary to replace all the objects that are created by 77 emulator objects that emulate the robot 77. In this case, change to the minimum configuration. Such objects-emulators can use methods of power that are identical to the powers of objects 77. Unfortunately, in 80 it is not possible to put a trigger on changing the power of an object, to that in some kind of depression (if the power is installed, it pulls a side effect), you will need to correct it with your hands. But such vipadkіv vanished. The bottom line is that the objects are replaced by different forms. Luckily, the "Create Object" function is not used by 80, so you can put on it a changeover, which is the replacement of the object to create a similar object-emulator: Function CreateObject(ObjectType) Export ObjectExport("ObjectType",10)="Dovidnik" TodiProbki.Dovidnik.Create(ObjectType); ElseYakscho Lion("ObjectType",8)="Document" Todі Obrobki.Document.Create(ObjectType); Otherwise Rotation Processing [ObjectType]. Create(); KіnetsYakscho; EndFunctions Possibly, it is better to emulate objects 77 through OLE object, which I will need a copy-emulator, written by my 77, and additionally change the reading of authorities, as well as dynamically change the warehouse of authorities of objects. Ale, for the time being, our order has less work to do. Application object emulators It’s a pity, the labor is not able to make a fortune, if they turn to power, they can’t win. Therefore, it is better to replace all the letters to the details of the object 77 through CurrentObjectand others similar to the new, the power of the object to be read as a riddle and available for reading. The object-emulator is guilty of this kind of behavior due to the revenge of various authorities of all objects. Read about other ways of emulation at the "Reasonable Point" branch. Some short emulators can be broken, so that you can correctly complete the output code 77 for the help of regular viruses. As you know, in 80 you can recover all the modules in a file, convert them, and then convert them back. Otzhe, "reasonable point." The essence of this is to know everything up to the authorities of the object through the point that replace їх with wiki method OtrimatiAttribute/
Set Attribute, which can establish power. Viraz replace for reading power: Viraz replace for the establishment of power: In this case, access to the powers of the emulated object is no longer possible through wiki methods OtrimatiAttribute/
Set Attributescho allow gnuchko cheruvati readings of authorities of objects. Even though you don’t have much to do with regular virazes, you can hire a student who can complete the qi points himself (you can complete it in base 77), so that it will be easier to cross over. The general work can be estimated by running a global search for the symbol "." for the configuration and pay the student purely for the number of rows. The work is mechanical. About the development of the method Reveal, work of a million lemingiv, who translate self-written changes from 77 to 80 appearing slavish, to that which could be drunk in another way. Fortunately, this information will become better in the future for programmers to switch from 77 to 80. Zgodom, if the configuration is transferred in a similar way from 77 to 80, you can partially transfer it from objects-emulators to objects 80, even in the course of work. Contexts Wart respect that when the section is shown (as well as the numbered functions of the template), all changes are available, visible in the context of the view. For 80 їх it is necessary to fill in parameters, the best structure. In Forms 77, it is possible to calculate the number of fields for writing and the middle values of the table. Periodic details of dovidniks For simplicity, periodic details can be collected in one register of records with periodicity before date, and the structure of the difference is Dovidnik (sent to the document), Requisit (identifier or value of redevelopment (shorter)) and the resource The value is of a sufficient type. Constanti The simplest way is to create one register of records per skin constant from a given periodicity. //Exit code: Constant.MainWarehouse Constant.Ker_vnik.Remote('12.10.1980'); // Changed to: Create Object("Constant"). Otrimati ("Main Warehouse"); Create an Object ("Constant"). Otrimati("Kerivnik", '19801012'); Exchange For 1C8 files, it is not possible to wick the function in the names of Vikonati, before launching it, you will need to wick the global change .
Vikonati on ._ Vikonati. Another tricky method Constant = New Struct(); For dermal Element 3 lConstant77 Loop Constant.Insert(Fire, Processing.Emulator77_Constant.Create()); EndCycle; That's it, don't change the code. The output code of the constants works. At the end of the past year, I already posted the article Prote to often ask me in comments to ask for a reply on how to install 1C 8. Vrakhovuyuchi popularity tsієї topics for the site, I have published an updated article about those how to install 1C 8(For platform 1C: P_dpriyomstvo 8.2). In this article, you will see the installation of a platform, a key emulator (for those who violate the law and do not buy a license for 1C company products) and install a clean configuration of business accounting. For the beginning, you need an installation package of the 1C platform. Yogo can be taken on the ITS disk or zavantazhit on "Polygon" in . My application will have Platform 8.2.15.294 (x32). For 8.3, everything works the same way. After unpacking the archive, you need to run the setup.exe file from the folder, in which the unpacking of the platform installation files was unpacked. On the side of the vent that has started, you need to press the button "Dali". On the next side, the installer will prompt you to select which components to install as you need. Among them will be: Select the required components, press the button "Dali" to go to the front side of the installation, on which one you need to select the required mov interface, as you will win for the lock. My mind is Russian language. After selection, press the button again "Dali". The next screen will appear, as you have chosen the components for installing the 1C: Enterprise Server. On a new one, you need to build up, with some pracyuvatime, a 1C server. Before the completion of the installation process, the program will prompt you to install the driver for the driver. Those who choose to violate the license agreement of the 1C company, having turned into a key emulator, can uncheck this box and start installing the driver. When the program is installed, tell about the result and request to read the Readme file. The emulator (or rather the patch) can be purchased there. If you have installed the 1C server, then it is necessary to go to the services of the 1C Server Agent supinity. After the service has started (otherwise you didn’t install it), you need to run the patch and find the path to the backbas.dll file, which is located in the directory from the installed 1C. Once the file is successfully processed, the program will tell you about it. How to write Success! it didn’t, it means that at some stage you started pardoning, otherwise you have a version of the platform, which is not supported by the patcher. After that, you can start the 1C Server Agent service. I'll start again to ask you to send the distribution kit of Accounting on the ITS disk or in the "polygon" distribution, which I already gave more. Obov'yazkovo reversal, schob distribution kit, whichever you want, do not have a name (upd). These letters marked the update files and you can't create a database from them! After unpacking the archive, run setup.exe and press the button "Dali". On the next side, you need to specify the path for inserting templates in the configuration of Business Accounting (or other configuration, as you set). I strongly recommend that you get rid of that path, which is a prescription for zamovchuvannyam, so that you can get away with a little "haemorrhoids" and offensive food like "... why do I have ..." For promotions, templates are copied from the profile of the koristuvach. For Wimdows 7, the path will be similar to the one on the screenshot below. To create a database, you need to run 1C: Enterprise from the menu "Start" or from the work table, and press the button "Add". Please select item "Creation of a new information base" and press the button "Dali". At the next vіknі choose the configuration, how to install the time. Installation option with additional word (Demo) at the name of the configuration, install a ready-made database with test data, which can be used to get started with the configuration. emulator- this program, yak іmіtuє the work of various physical devices of other programs. For example, virtual disks, game console emulators, and so on. The article looks at the HASP host emulator. HASP- a hardware and software complex for protection of software against illegal (unauthorized) vikoristannya and rozpovsyudzhennya. The system was developed by the company Aladdin KS, which includes: – electronic key (USB key fob); Іsnuyu vyznі vykonannya HASP key: - Keychain USB; The largest possible width is a USB key fob. In the given hour, a few options for keys will be listed: 1) HASP 4 (first version of the archive), HASP HL (HardLock - current version) - all hardware keys. 2) HASP SL (Soft Lock) - software key. This key is more convenient for expanding the programs, but it can be less rіven zakhistu, lower for HL. 3) HASP SRM is a combined solution, in the new є choose - what to choose: hardware HL or software key SL. Such software packages are protected by HASP, such as 1C, Consultant Plus. The order of the zahistu is approximately the same. The key is connected to the first port of the computer. A special driver is being installed. The program was stolen through the new information about the defense. For the correct key, the program will continue to work, otherwise: the demo mode or just a chirp. Emulation of keys victorious in such types: - evil zahistu programs (hacking, illegal cheating - sorry); Such emulators are being developed for corysteve licensed software with a method of easing their work (no key fob is needed), which is not against the law. This means that you can have a licensed version of the firmware to install any emulator. For some reason, the key emulator is necessary, it is necessary for the mother to get ahead of the options for emulators, so to lie in: - The number of koristuvachіv programs; A lot of software has been created, including the Sable complex. They gave two specific examples. Additional information: www.xaker.name/forvb/showthread.php?t=20555&page=11 Unpack and run HASPHL2007.exe You need to install the driver and the original connection key. At the DRIVER program, press INSTALL - the driver is installed. Run the program edgehasp.exe- key generation. Enter the negative key before the “EMULATOR” tab. Press "StartService". Run the protected program, distort it to the robot, then, as if everything works, open the DUMPER window. Passwords are displayed at the window. To make a copy, press "DUMP". The result is a .dmp file. Run EDGEHASP.EXE to convert the file. Open the "DONGLES" file in the "HASP/Hardlock Emulator" window and enter the file name. Clear the dump - CLEAN button. You can speed up. 🙂 Information can be found at the address: www.emus2.narod.ru/emulyator-sable.html Run Sable and get reloaded. Vidality Shortcut Emulator C:\Documents Settings\All users\StartMenu\Programs\Startup run C:\ProgramFiles\SABLE\. run delnt.bat- Vidal Hasp from the register. Install Hasp Emulator C:\ProgramFiles\SABLE- Run instnt.bat. run startnt.bat. PU - system - Installation - DU Menu View-ShowHiddenDevice - Click NonPlag… -Scan for hardware… Power (Propetries - hasp Automatic.) Ok. Copy patch77. exe h C:\ProgramFiles\sable to folder 1C. Run patch77.exe/F1cv7.exe. Respect. Guided instructions - these are butts, where it is necessary to be guided by the real situation. Here you can Zavantagety HASP emulator absolutely harmless. I have everything for today follow the blog by email. I check your comments in the comments. Boo!
2) HTML files - a different description of the help and selection of configurations
3) 1cv8.cf - in the same file it is saved - 1C configuration
4) 1Cv8.dt - from which file the archives of the data base are saved on the basis of the configuration, select the demo database; Delete the file at your own configuration and data
5) 1cv8.cfu - configuration update file, which is changed for switching from one configuration version to another
6) TTF files - font files, used for example for other barcodes, to respect, fonts need to be added to the system, so stink is in the distribution config
7) XML files - often with configuration, different classifiers are supplied, they are included in the database of the world to be seen in future releases;
8) the ExtReps catalog - zvnіshnі znіti ta obrobki, yak vikoristovuyutsya for appearance, often so stuchayutsya zvіti, yakі often zmіnuyutsya, for example raznі drukanі forms
9) the TradeWareEpf catalog - images that are available for connection, we can look at future releases
10) directories Conv_ХХХ - such directories save "conversion rules", the rules for which you can convert data from one database to anotherSoftware key zahistu 1C
Hardware key zahistu 1C
Use 4 types of hardware keys, leather may have a different color and marking:
License Manager 1C
Vidpovіdі on nutrition, which is often put behind the keys to zahist 1C:
No. 1. 1C do not download licenses
No. 2. The HASP driver will be restored with mercy.
No. 3. Pardon: HASP not Found (-3), (Error 7), (H0007)
No. 4. HASP Device Driver not installed (-100)
Object emulation
For example, the object " Accounting bags» 77 is replaced by the object Processing. AccountingPacks77.
It’s possible, it’s better to emulate objects not with shapes, but with forms, but it’s better to make us speed up with the advances of trilank architecture, then at the forms ObrobnikZmeniDanih, which reacts to the change of these forms and is faster for everything, you can dynamically change the warehouse of forms. The food should be followed.
In short, create an object-emulator for a skin-type application object, below, use the entire functionality of 77 skin-type application object 80.
Tobto. for example, it’s better to create a job, what to revenge propsRoomDoc”, below the skin document create requisites “RoomDoc».
Reasonable point
It is best to recognize the skin row 77 with a comment // 77 in the book, so that we do not stray with the code 80. The same code can be modified in a different way.
The point, after which the identifier follows, if there is not a sign “equally” after which - replace the point and the identifier with .
OtrimatiAttribute(Identifier);
A dot, followed by an identifier, after which there is a sign “equally” and farther away, some kind of viraz, which will end with a drop with a coma, with the words “ KіnetsYakscho», «
EndCycle”, “KіnetsFunktsії”, “KіnetsProcedures" and so on - replace the dot, identifier, sign i .
Set Attribute(Identifier, Viraz).
Formy
In forms 80, all billings need to be transferred to the podiumUpdatingRefreshment.
Vrahovyuchi, scho documents can set the details of periodic details of the date and when the details are taken from the transaction, the details can be seen, it’s better to start a register, which is not subordinating to the registrar, that details of the second register “Document”. At the time of executing the document, all entries in the corresponding register are seen, and the props “Document” are indicated for the whole document.
At this time, a universal processing is possible for transferring constants to a given date in the main register of information.
The key word is Kostyanti. you need to change it to weekly Create Object("Constant").
But the implementation of the class Constant in the form Constant is up to you.
Butt:
Ale, there are no objects in 1C7 using the Vikonati method. ;-)
PWhile the article was being written, I saw one more tricky method of fighting 1C exchanges. Sob did not happen to shukati dots in the code, you can robiti іnakshe.
Let's take a look at the butt of constants.
It is allowed to save the list of symbolic constants at the array at the global change glConstancy77 .
It is possible to use a constant emulator with the methods Remove and Install, we can find it in the sample Emulator77_Constant.
We create the same global change Constant.
Dali:
Similar to pratsyuvatime and code of documents and documents without specks.
It’s enough to put on a leather requisite a copy.
A good pidkhid in fact, the output code is not changed.How to install 1C 8
Platform installation


Robot with 1C key emulator


Setting the configuration of business accounting


Creation of a base from a template


The keys are issued for different operating systems - Windows, Linux, Android and 32- and 64-bit computers.
- special software for binding to the key, to protect the program from data.
- Key LPT;
– PCMCIA map, internal PCI map.
- Nest_yka robot HASP keys;
- Vihіd z fret or vtray key;
- Invisibility of key selection on different computers.
- versions of the programs - merezhna and local koristuvachiv;
- For which server you need an emulator - Server 2003, 2008 and in.Hasp HL emulator installation
exctcryptor.ucoz.ru/haspharddong2007.zipInstalling the Sable emulator